
About two weeks after the launch of Last Epoch Season 5, research and evaluations for various builds are well underway. Attention is drawn to a wide range of choices, from builds utilizing new items and reworked skills added in Season 5 to setups that have previously demonstrated powerful performance.
In particular, as more Travelers enter the true endgame, boss combat performance and stable farming capability are becoming key criteria for selecting builds. Here is a curated overview of seven currently well-regarded builds and their defining characteristics.
1. Bleed Skeleton Necromancer

Bleed Skeleton is a build that relies on multiple Skeletons to stack Bleed damage. Unlike standard minion builds, it maximizes damage over time by rapidly stacking Bleed through high attack speed rather than relying on the Skeletons' direct strike damage.
The core of the build lies in using the Unique item 'Unbroken Legion' to dramatically increase the maximum number of Skeletons that can be summoned. On top of that, Aura of Decay is converted to focus on Bleed, while Dread Shade, Bone Curse, and Rip Blood are utilized to boost the Skeletons' attack speed and damage over time.
An advantage of this build is its easy controls, as the Skeletons automatically track enemies. However, it takes time for Bleed damage to ramp up, which can make clearing large groups of monsters feel somewhat sluggish in AoE scenarios.
Furthermore, due to high reliance on key Unique items, it is difficult to expect the full potential of a completed setup early on. While it possesses survivability tools through Health regeneration and Ward, its ability to withstand heavy incoming hits varies significantly depending on gear quality. This build is recommended for Travelers who enjoy minion-centric combat or want strong boss-killing capabilities.
▶ View Bleed Skeleton Necromancer Build
2. Shield Throw Time Rot Void Knight

This build converts Shield Throw to Void damage and stacks Time Rot on enemies to inflict potent damage over time. Contrary to its name, it dual-wields two one-handed weapons instead of equipping a shield, offering high movement speed, wide AoE coverage, and strong boss DPS.
The core mechanism involves using the Set body armor 'The Last Bear's Scorn' to convert Shield Throw's damage to Void. As Shield Throw bounces repeatedly between enemies and the character, Time Rot accumulates and spreads damage to nearby foes. Devouring Orb, Abyssal Echoes, and Volatile Reversal are then used to apply additional damage and debuffs.
At high gearing levels, it delivers not only massive boss firepower but also exceptional survivability. Thanks to fast movement speed and multi-target hits from Shield Throw, it performs remarkably well in standard mapping as well. However, because maximum performance requires executing precise skill rotations while managing main attack and support cooldowns, it requires a clear understanding of its mechanics to perform at its peak.
This build is recommended for Travelers who are comfortable with complex skill combinations and want to steadily upgrade gear to tackle high Corruption and formidable bosses.
▶ View Shield Throw Time Rot Void Knight Build
3. Static Orb Sorcerer

The Static Orb Sorcerer build significantly stacks maximum Mana and converts it into high Lightning damage and Ward generation. The higher the Mana pool, the stronger Static Orb becomes, creating a unique synergy where consuming vast amounts of Mana directly powers survivability.
The key is reaching Mana thresholds—300 for stage 1 and over 1,000 for stage 2—to trigger the Sorcerer passive 'Archmage', then spamming Static Orb. Static Orb unleashes a powerful explosion along with multiple smaller orbs, hitting a single target numerous times. Activating the 'Arcane Ascendance' skill roots the character in place, but allows for unleashing astronomical burst damage in return.
Its greatest advantage is scaling offense and defense simultaneously. With a sufficient Mana pool, it generates Ward rapidly while dealing massive damage to bosses. However, Mana burns quickly during combat, requiring the use of 'Focus' to replenish it when depleted. Since the character is vulnerable during Focus and rooted during Arcane Ascendance, proper use of 'Flame Rush' is crucial. The brief window when Ward drops is the most dangerous, requiring extra caution.
It requires adequate gear with Maximum Mana, Spell Critical Strike Chance, and Ward stats to function effectively, making it difficult to run in a complete state early game. Recommended for Travelers who enjoy resource management and dealing heavy burst damage while monitoring Mana and Ward state.
▶ View Static Orb Sorcerer Build
4. Flame Reave Spellblade

Flame Reave Spellblade is a melee mage build that prepares buffs with Firebrand before unleashing a devastating burst of Fire damage all at once. Featuring an extraordinarily wide AoE that expands Flame Reave in a circle, it excels at both clearing large crowds and delivering heavy burst damage to bosses using high attack speed and critical strike damage.
The key is attacking four times with Firebrand to simultaneously accumulate Firebrand, Rhythm of Fire, and Blade Weaver stacks. Utilizing the Unique item 'Sun Wreath' allows Flame Reave to expand in a full circle around the character and return, striking the same enemy multiple times. It also leverages the Lethal Strike effect, which converts excess Critical Strike Chance into additional firepower.
Its main strengths are screen-wide AoE coverage and massive burst damage. Flame Rush allows rapid closing on enemies, and empowered Flame Reave strikes surrounding monsters simultaneously, proving highly effective during standard clearing. Combat survivability is solid thanks to Health Leech via melee hits, Ward generation, and damage reduction from Flame Ward.
However, dealing maximum damage requires pre-stacking buffs, along with managing Flame Reave's cooldown and melee positioning. Additionally, expected DPS cannot be achieved without sufficient core items and offensive stats. This build is recommended for Travelers who prefer fast-paced melee combat and wide AoE sweeps.
▶ View Flame Reave Spellblade Build
5. Blood Wraith Necromancer

Blood Wraith Necromancer is a minion build that sacrifices Skeletons to summon empowered Blood Wraiths, which stack Bleed on enemies. While the previously mentioned Bleed Skeleton Necromancer uses Skeletons themselves as the main attack engine, this build uses Skeletons as fuel to create Blood Wraiths.
The core is the synergy between Assemble Abomination and Sacrifice. By setting Sacrifice to trigger automatically whenever the Abomination attempts to consume Skeletons, empowered Blood Wraiths are generated via the 'Crimson Horror' node in Sacrifice. Summoned Blood Wraiths attack enemies with high Bleed Chance, high Health, and Health Leech, with their attack speed and damage further amplified by Dread Shade.
Similar to the Bleed Skeleton build, a key advantage is that creating Blood Wraiths and attacking with them is largely automated. The Abomination automatically sacrifices Skeletons, while spawned Blood Wraiths seek out targets to accumulate Bleed. Explosions from Sacrifice assist in clear speed, allowing the character to focus on dodging and surviving while minions fight. Blood Wraiths also boast high base Health and Health Leech, maintaining a stable front line during battle.
However, recovering if the Abomination dies or the Blood Wraith count drops can be cumbersome. Resupplying Skeletons and spawning Blood Wraiths makes its minion setup structure relatively more complex than that of the Bleed Skeleton Necromancer.
▶ View Blood Wraith Necromancer Build
6. Tornado Shaman

Tornado Shaman is a Lightning spell build that creates multiple Tornadoes to strike enemies. Rather than relying on Tornado's direct Physical damage, it relies on repeated Storm Bolt procs triggered by the Tornadoes as its primary damage source.
The core relies on combining Tornado, Storm Bolt, and Maelstrom. Tornadoes continuously proc Storm Bolts empowered by skill nodes, while Maelstrom provides additional bolts and damage multipliers. Warcry secures Maelstrom stacks and various buffs, while summoning a Water Elemental helps absorb a portion of incoming damage. In particular, a Frenzy setup utilizing the Unique item 'The Butcher's Crown' dramatically boosts Attack and Cast Speed, elevating overall DPS.
Its greatest strength is high hit frequency and sustained DPS output. Multiple Tornadoes and Maelstrom continuously proc Storm Bolts to focus heavy damage on bosses, while persistent Tornadoes deal damage even as the player dodges incoming threats.
However, during Frenzy, continuous Health loss and restricted natural Mana Regen can make survivability volatile. Health and Mana sustain become difficult when unable to strike enemies, and losing the Water Elemental removes damage sharing. Reliance on key Unique items to complete the Frenzy setup is also high. Recommended for Travelers who favor high hit rates and sustained DPS while staying mindful of resource management.
7. Doppelganger Shadow Cascade Bladedancer
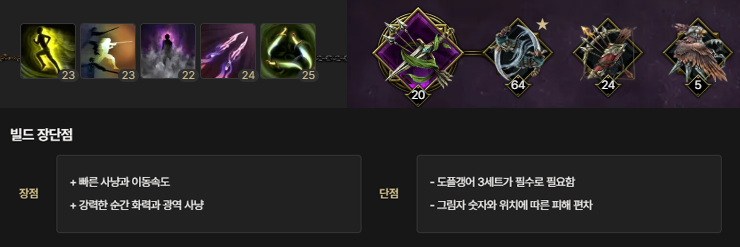
Doppelganger Shadow Cascade Bladedancer is a melee build that creates multiple Shadow clones to unleash powerful AoE attacks together. Utilizing the Doppelganger 3-piece set allows Shadows to spawn even when using Evade or movement skills, enabling fluid movement while naturally preparing the next strike.
The core strategy is spawning sufficient Shadows before executing Shadow Cascade. Generating Shadows with Evade and Shift, then placing additional ones with Synchronized Strike before casting Shadow Cascade lets the character and clones hit surrounding enemies at once. Higher Shadow counts increase AoE and damage, while Dusk Blade and Shadow Daggers add extra single-target burst against bosses.
Its major strengths are top-tier mobility and explosive burst DPS. Multiple Shadows executing Shadow Cascade wipe wide screens of enemies instantly while chunking boss health pools. Stacking Cooldown Reduction speeds up movement and attack cycles further. Spawning Shadows restores Health and Ward, while Smoke Bomb and Dodge synergies bolster overall defense.
However, completing the Doppelganger 3-piece set is mandatory to assemble the core Shadow generation engine. Missing Shadow setups or targets moving out of AoE range will drop DPS, while spending Evade and Shift offensively may leave movement options unavailable in critical moments. Relying on Dodge and recovery rather than high Armor requires careful maneuvering against heavy telegraphed hits. Recommended for Travelers who love fast movement and flashy combo combat.
▶ View Doppelganger Shadow Cascade Bladedancer Build