Have you just started Apex Legends? Are you still not sure where the best places to land are? The early stages of a battle royale game dictate whether or not you'll make it far into the rounds or not. Which places can I go for each map rotation? Which location offers the greatest amount of early loot?
In this comprehensive map guide, we'll show you what each location in Kings Canyon offers in terms of loot and strategical advantage. This guide will also measure the popularity of a landing location to evaluate the overall value of each area.
Slum Lakes
Popularity: ★★★☆☆
Rotations:★★★★☆
Loot:★★★★☆
The Slum Lakes is an objective located in the far Northwest end of Kings Canyon. The area is essentially a collection of small buildings packed closely together. Since it's located at the edge of the map, it's a great starting place for those that prefer to hug the circle throughout the game.
Although the Slum Lakes is a mid-tier area, the location has a large quantity of loot and gives you a wide array of places to rotate to. If you enjoy fighting, you can head to the Runoff or The Pit. If you feel that you're under-geared and want to play it safe, you can rotate towards the northern area.
The Slum Lakes isn't that popular of an area, but always be wary that you may need to fight off 1 or 2 squads for safe looting.
Artillery
Popularity: ★★★★★
Rotations:★★★★☆
Loot: ★★★☆☆

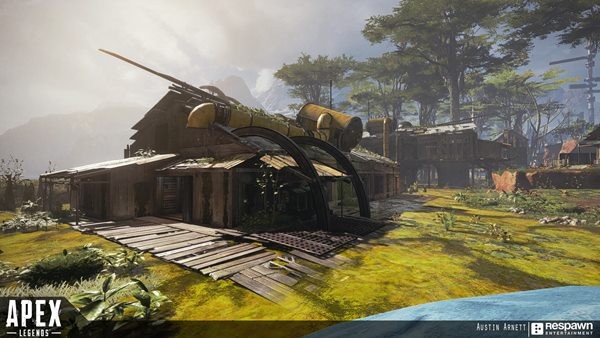
The Artillery is a high-tier area located at the far north end of Kings Canyon. The area has two large buildings, two underground structures, and a building built into the cliff at the northern end. Two zip lines connect the three buildings for fast exploration.
The area has a decent amount of loot and is a great place for rotating into the Watchtower North, the western tunnel, or the Two Spines. However, the Artillery is an immensely popular area, and you'll need to most likely fight off 3 to 4 squads to claim the area for safe looting.
Watchtower North
Popularity: ★★★☆☆
Rotations: ★★★☆☆
Loot: ★★☆☆☆
The Northern Watchtower is a high-tier area and is an extension of the Artillery. It's located south of the Artillery and just north of the Cascades.
Having limited supplies, this area isn't exactly the best place to land as a starting location. However, if you are able to successfully claim the Cascades and gear up, it gives you a number of options to plan out your next move. You can fight off the squad coming down from Artillery or rotate towards the Bunker and the River's Center, or the Slum Lakes.
You must be wary, however, since you can be sandwiched by teams from multiple directions. It could become even more dangerous when you're down near the Cascades and a squad from the Artillery rotates over to the Watchtower to shoot you from the high ground.
Relay
Popularity: ★★★☆☆
Rotations: ★★★★☆
Loot: ★★★★☆

The Relay is a high-tier area located at the northeast corner of Kings Canyon. It is located east of the Artillery and north of the Wetlands.
The Relay has a lot going for it - it has a great amount of loot, it's located near the Artillery and Wetlands, and you can grab additional loot from the Two Spines and the Farm when starting from there. However, despite all its positive aspects, it's not that popular of an area, so it's often a great place to start.
Be mindful though; the area is pretty large and it has a mix of high and low ground. Fighting can be very difficult in this area, especially when fighting against two or more squads.
Wetlands
Popularity: ★★★★☆
Rotations:★★★★☆
Loot: ★★★★☆
The
The area is quite popular and deservingly so; the Wetlands have a good amount of loot and you have a wide array of places that you can rotate to. Prepare to fight off against at least 1 or 2 squads, and be careful of enemy legends firing at you from high ground.
Swamps
Popularity:★★☆☆☆
Rotations:★★☆☆☆
Loot:★★★★☆
The
Relative to other areas, the Swamps is one of the least popular places to land in. Despite its low popularity, however, the Swamps is actually a great starting place that offers a ton of loot. If you are the type to avoid fighting in the early game, the
The one problem with the Swamps is that having to fight against even 1 other squad can be extremely challenging. The area is huge - quite possibly the largest area in the game - and outside the buildings, there are no covers whatsoever. The area is large so it's more efficient if your squad splits up to loot. However, if you spot another squad dropping with you, try and stick with your team as much as possible.
As mentioned, the area is very large, so it'll take time to loot up. In addition, it's located at the edges of the map, so it's important to try and loot as quickly as possible before the circle begins closing in.
Hydro Dam
Popularity:★★★☆☆
Rotations:★★★☆☆
Loot:★★★☆☆
The Hydro Dam is a fairly popular, low-tier area just north of the Repulsor and south of the Shattered Forest. The area is medium-sized and it's connected to the Repulsor by two bridges.
The place has its downsides: rotating to the Swamps from the Dam is pretty inefficient in terms of distance covered and time spent, and rotating towards the Repulsor requires inevitable fighting. This place is great for those who don't like fighting and want to loot up as much as possible through the "Hydro Dam - Swamps" rotation.
Repulsor
Popularity:★★★★☆
Rotations:★★★☆☆
Loot:★★★☆☆
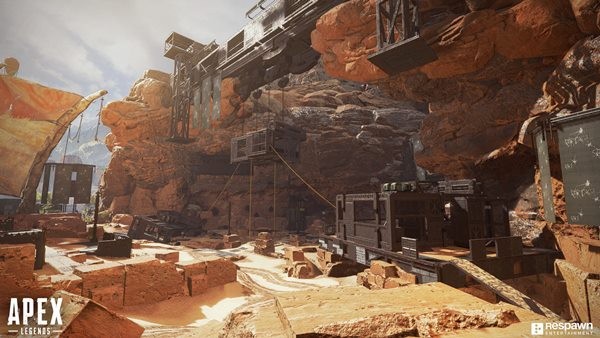
The Repulsor is a high-tier area located south of the Hydro Dam, and it's essentially the 'Artillery of the South'. Similar to the Artillery, the area has a Watchtower as an extension, and it's an extremely popular drop point. The general map design of the Repulsor is similar to the Artillery as well.
The best place to rotate to after claiming the Repulsor is towards the southern Watchtower and the river, as the Hydro Dam doesn't offer too much in terms of loot, and trying to reach the Swamps is inefficient.
Water Treatment
Popularity:★★☆☆☆
Rotations:★★☆☆☆
Loot:★★★☆☆
The Water Treatment is a high-tier area located at the South end of the map. It is located east of the Thunderdome and south of the Market.
The area is essentially one large building with multiple corridors, surrounded by tubs of water. Lootable items only appear in the building, so the amount of loot is very limited. The area's reclusiveness and lack of loot make the Water Treatment mediocre at best in terms of a drop area.
However, if you can quickly claim the location and rotate towards the Thunderdome, it can put you in a good spot for the early-to-mid game.
Thunderdome
Popularity:★★★☆☆
Rotations:★★★☆☆
Loot:★★★★☆
The Thunderdome is located on the far southwest corner of Kings Canyon. It is just south of the Airbase and west of the Water Treatment. The area is fairly open, and there are a few large structures that spawn gear.
The Thunderdome has a very large platform at the center of the area that hangs high above the ground. The only way to get on the platform is through a zip line, and the location grants a considerable high ground advantage to those fighting on it. If you land on this area with multiple other teams, it's recommended that you and your squad quickly gear up and claim this platform. You'll have an easier time spotting the enemy squads and it'll give you a combat edge.
After claiming the Thunderdome, you can rotate to the two settlements that surround the dome, which have plenty of loot for you and your team. Also, always be on the lookout for squads from Skulltown!
Skull Town
Popularity:★★★★☆
Rotations:★★★★☆
Loot:★★★★☆

Skull Town is a very popular drop location that is located east of the Market and northeast of the Thunderdome. The area is a collection of buildings that form an 'X' shape, and the buildings vary in size.
Skull Town has a lot of loot, and as a starting location, the place offers a lot of options for you and your squad to rotate to. There are minor objectives such as the settlements to loot from, and you can decide to either fight the squads from Thunderdome or the ones from the Market.
However, as mentioned, Skull Town is a very popular area, so there will be a lot of competition upon dropping here. If you can claim the area, it'll put you in a good spot for the remainder of the game.
Also, make sure to check the roof of the large buildings! They often have high-quality gear for you to loot!
Airbase
Popularity:★★★★☆
Rotations:★★☆☆☆
Loot:★★★☆☆

The Airbase is a high-tier area located at the east end of Kings Canyon. It is just south of the Runoff and north of the Thunderdome. The area is fairly open with a few structures with varying elevations.
Although the area is fine in terms of loot, the Airbase is very underwhelming in terms of rotating to a new area. The entire place is separated by a high dam-like wall that is placed between the Airbase and the desert area, and traversing through the Airbase can take a long time without Pathfinder or Wraith.
Although we believe the area doesn't have enough positive attributes to warrant its high popularity, if you like fighting early in large open areas, the Airbase is the place for you.
Runoff
Popularity:★★★☆☆
Rotations:★★★☆☆
Loot:★★★☆☆
The Runoff is a high-tier area located just north of the Airbase and south of the Slum Lakes. Similar to the Water Treatment, the Runoff is essentially an area that contains one very large building that is connected by corridors, with a few small buildings decorating the outer edges of the area.
Although the Runoff is similar to the Water Treatment, the Runoff is in a better location on the map, and you have a lot of places, such as the Airbase and Bunker, that you can rotate to once you clean the area.
The Runoff is a fine place to land, but always be on the lookout for other squads. Since the area is at the center of many popular drop points, there's a high risk that you and your squad can get sandwiched by squads from multiple directions.
Bunker
Popularity:★★★★☆
Rotations:★★★★★
Loot:★★☆☆☆

The Bunker is a high-tier area located east of the Airbase and north of Skull Town. The Bunker is essentially a large building that is embedded into a small mountain, connecting the desert area to the river. The Bunker has two entry points and there are four rooms in total within the structure.
Although the area has very limited loot, it's in a fantastic location that can give you and your squad a strong positional advantage. In addition, since the Bunker isn't as popular as say, Artillery or Skulltown, there isn't as much competition.
Once you defeat the one or two squads that may drop with you at Bunker, you can easily rotate to and claim the settle east to the Bunker or River Center.
The fights that take place at Bunker will mostly be close quarters. As the rooms and corridors are very small and compact, Caustic will be a menace at this location.
Image credit by Respawn Entertainment's Artstation and its Environment Artists

Sort by:
Comments :0