Topic: A Guide to Creating 2D Animation Using Unreal Engine Cartoon Rendering Speaker: Lee Jae-hong, Technical Artist at Neople Category: Visual Art & Sound Recommended Audience: Technical Artists, 3D Modelers, and Animators
Tags: #CartoonRendering #WorkflowAutomation
[🚨 Session Topic] This session explores the implementation of Japanese-style cartoon shaders in Unreal Engine, based on three years of experience producing in-game cutscenes and promotional videos for 'Dungeon & Fighter.' The goal is to eliminate the uncanny feeling typical of 3D graphics and perfectly replicate the aesthetic of 2D cel animation. I will share the process of building a shader synchronization pipeline that aligns visuals in real-time across various DCC tools—such as 3ds Max, Maya, and Substance Painter—and the engine, aimed at reducing artist fatigue and increasing the accuracy of final output predictions.
Toon shading is the most widely used technique in 'subculture' games, a genre that has evolved from a niche category into a mainstream phenomenon. Because these games are 3D-based but must retain the aesthetic appeal of 2D animation, developers naturally invest significant effort and consideration into perfecting their toon shading.
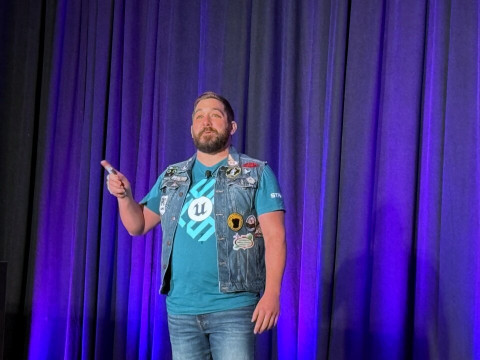
For developers looking to create games based on toon shading, Neople Technical Artist Lee Jae-hong shared his expertise on the challenges faced during development and key considerations for success.
Why does my toon shader look awkward?
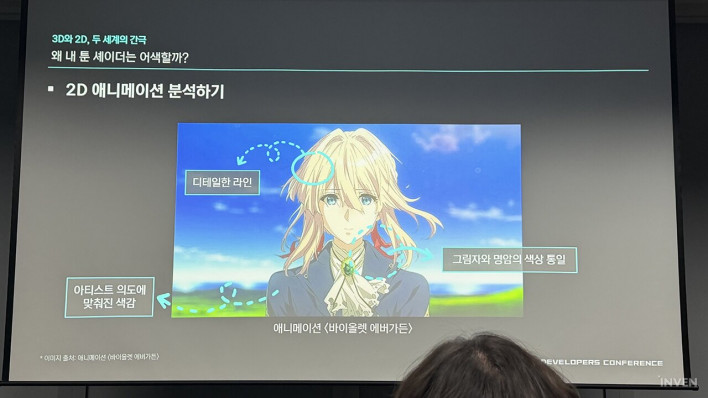
Lee explained that early in his career, he struggled to remove the '3D-like' awkwardness from his toon shaders, identifying 'excessive texture presence' and 'dull shadows' as the primary culprits. His analysis suggests that when shader shadows were applied over textures (such as drawn muscles), it created the impression of a gradient being 'painted' onto a 3D model, while the default shader's simple multiplication of achromatic shadows resulted in muddy colors.
He stated, "Simply dividing light and dark areas is not enough to erase the feeling of a gradient painted on a 3D model." To solve this, he analyzed the artwork of high-quality 2D animations like 'Violet Evergarden' as a reference.
The solution he derived focused on limiting texture detail, creating natural dark areas and shadows, increasing line density, and utilizing a vibrant color palette.
He explained that by limiting texture detail, he was able to minimize gradients and simplify shading into two or three tones, ensuring that shadow colors and dark areas blended naturally. Instead of relying on simple textures, he increased detail by adding complex lines to areas like hair and collars. Furthermore, he moved away from simple black shadows, applying clear, vibrant, shader-specific colors tailored to each part (face, hair, clothing, etc.) according to the artist's intent.

Techniques for Perfect Control of Light, Lines, and Shadows
Lee divided the work into three areas—light, lines, and shadows—and began an advanced control process. To control light, he separated textures and utilized world normal maps. To prevent the unnatural separation of light and dark areas, he generated 'fake lights' that only received directional information from the base lighting. At the point of light calculation, he added black-and-white Ambient Occlusion (AO) textures before applying color in the final stage. This allows real-time lighting and textures to blend naturally.
Additionally, by completely separating base textures from shade textures, he ensured that shadow areas displayed unique colors specified by the artist rather than achromatic tones. To prevent facial shading from looking distorted at certain angles, he applied a 'hand-crafted world normal map' that allows for sculpting shadows regardless of the mesh shape, creating the attractive shading characteristic of 2D art.
Lee also discussed his know-how for maintaining sharp line rendering and the rediscovery of the G-Buffer. During the production of the 'Dungeon & Fighter Mobile' promotional video, low depth buffer precision caused lines to break. He solved this by adding logic to calibrate scene depth values based on distance using parameters, ensuring sharp lines regardless of size or distance.
He also mentioned repurposing the 'Specular' channel of the G-Buffer—which is typically unused in cartoon rendering within a Physically Based Rendering (PBR) system—as a custom ID map. By assigning a specific specular value only to the bangs mesh, the post-process could detect it and draw eyebrow lines only in that area. Furthermore, by extracting a hair boundary mask using a Sobel filter, he slightly erased eyebrow lines where they met the hair, achieving extreme detail that makes the hair appear thin and translucent.
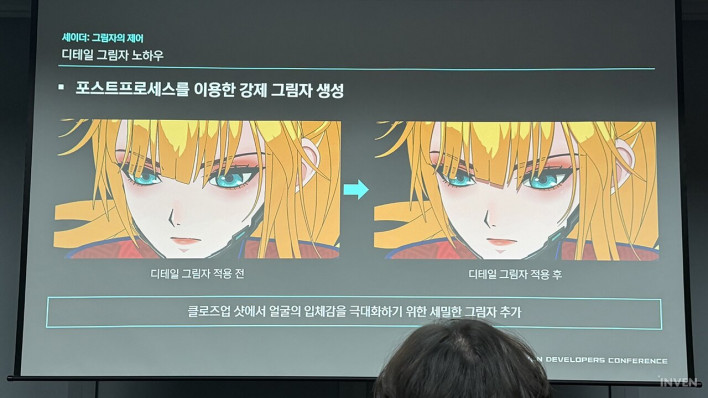
Regarding shadow control, Lee explained the use of post-processing and the metallic channel. Using fake lights often results in a lack of shadows between objects, making characters look detached from the background. To solve this, he calculated the difference between the final rendered output and the base color before lighting was applied, extracting only the 'shadow areas' darkened by light during the post-processing stage. He added depth by overlaying the shade color stored in the G-Buffer's Subsurface channel.
He also mentioned using the 'Metallic' channel as a custom ID to force the 'detail shadows' characteristic of 2D art. After assigning metallic values (e.g., red for hair, yellow for face), he set a rule in the post-process: "If the current pixel is yellow and the pixel directly above is red, draw a shadow." This enabled precise, localized 2D shadow effects completely independent of light direction.
Minimizing Guesswork: Pipeline Innovation
Lee shared how the Neople team mitigated the stress caused by artists having to guess the final look when it could only be verified within the engine. They completely overhauled the pipeline to allow artists to preview the final look—similar to the engine's output—in real-time within their primary DCC software.
Key improvements included upgrading the 3ds Max environment for modelers, optimizing the Maya workflow for animators, and porting Substance Painter for texture artists. For 3ds Max, he analyzed the core logic of the Unreal Material Editor (light, AO, base color, rim, outline) and converted it into a shared HLSL shader for use in Max. This removed unnecessary texture logic, making the workflow lighter and allowing modelers to see the effects of light and shadow in the Max viewport in real-time.
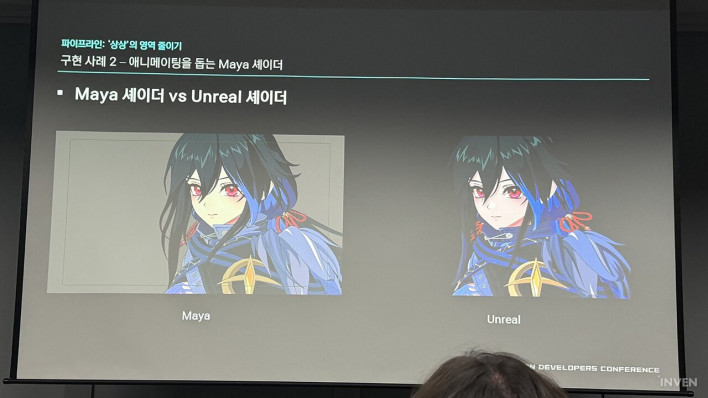
For Maya, the previous inefficient workflow involved exporting to Unreal to check for broken lines and returning to Maya if issues were found. He ported the HLSL shader to match Maya's syntax and provided a 'mini-tool' that allows animators to adjust depth intensity and line thickness directly. Lee noted that while they couldn't perfectly replicate normal lines due to rendering differences, the depth lines alone significantly increased work efficiency.
For Substance Painter, which is optimized for PBR, he converted HLSL shaders to GLSL to make toon shading work more comfortable. This allowed artists to check and paint black-and-white masks for line erasure in real-time and intuitively control toon-style rim lights using the metallic channel. He also built a system to automatically pack and export complex texture sets according to engine rules.
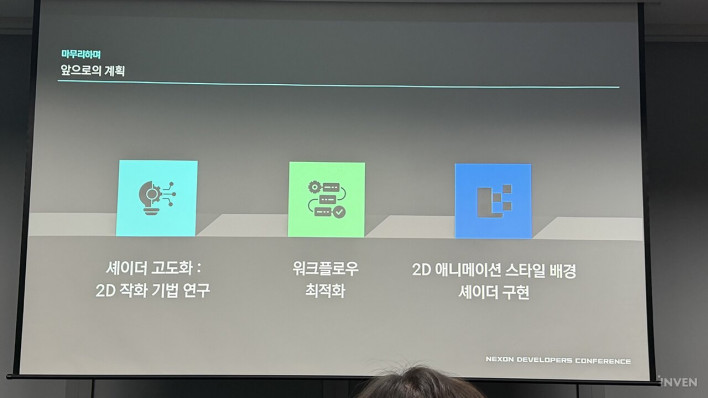
Concluding the presentation, Lee shared Neople's future vision. The goal is to replicate the feel of hand-drawn 2D animation as closely as possible. He indicated plans to provide an environment where artists can easily draw complex facial normal maps and to fully upgrade background shaders to match the 2D animation style as promotional video scales increase.
Sort by:
Comments :0