The early chapters in Returners are relatively easy to complete, but the difficulty becomes much higher as you progress further. Boss battles after Chapter 4 in particular often annihilate the whole party as they become extremely difficult. The combat power shown in the battle formation screen is somewhat less than yours, thus players often take it lightly and end up failing.
Therefore, you need to make a team while considering various elements including the boss’ preferred target, attack type, and defensive abilities in order to progress further after Chapter 4. Of course, the simplest tactic is to increase the combat power, but that is easier said than done, so let’s have a look at the more efficient ways to kill the bosses in limited circumstances.

Be wary of powerful AoE attack on rangers - Richard the Lionheart in Stage 16
In Stage 16 Chapter 4, Richard the Lionheart appears as the boss. The overall combat power of all stages in this chapter is about 20,000, and his combat power is a bit more than 10,000. However, the actual difficulty is much higher than what it appears; around here is when Adventure starts to give players a hard time.
Richard the Lionheart is a tank but is more of a bruiser due to his skillset. He has high basic HP and deals a considerable amount of damage, so you need to have enough combat power and also a means of protecting ally team members.
One of the key points is to have mages on your team to damage the boss. Richard can enhance his PHY DEF with Courage, and his normal PHY DEF is higher than his MAG DEF. It becomes extremely difficult to take him down when you have a group of PHY ATK-based damage dealers.
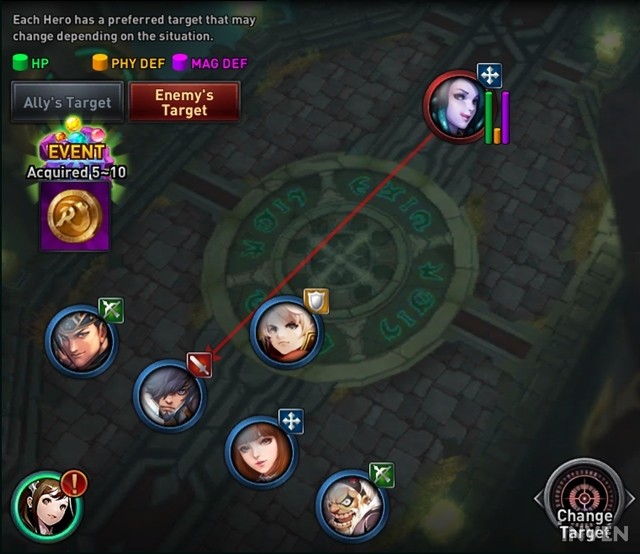
The most unfavorable class here is the ranger. Although the ranger is a widely used class from the beginning to the end of the game, it is not the best against Richard. This is because his preferred targets are rangers, and his ultimate skill deals 1.5 times the original damage to rangers.
Furthermore, his main attack skill called Dignity makes him spin around with his greatsword dealing AoE damage to the surrounding enemies, thus it is best to use ranged dealers that aren’t rangers, like mages. One thing you can do it click on Able to Retreat and team members will then be able to spread out while dealing damage to Richard; this way, most of the team members can avoid taking the AoE skill at the same time.
Since CC skills are not viable against the boss, duelist damage dealers are recommended more than disruptor damage dealers. Yuki Onna and Dracula, the mages you can obtain in the early game, are good choices. If you have not set up the runes, you can still use Little Red with other existing heroes you currently have. A melee class can be included in the team, but having many of them is not recommended at this point. Constant heals by a support such as Panacea can also be a good tactic.


Be prepared for the heavy MAG ATK - Aladdin in Stage 18
The boss in Stage 18 Chapter 4 is Aladdin. This stage needs 22,000 to 24,000 combat power, and Aladdin is 17,072. He is known as one of the most difficult bosses in the early-mid game along with Richard the Lionheart.
Aladdin is a mage with slow skill animations and strange hitboxes, thus he is not that popular among players. However, the slow skill animations, which is the biggest disadvantage for Aladdin, are made up for by his high HP when he appears as a boss. He buffs himself and increase the MAG ATK while sustaining the damage, and deals a considerable amount of damage to the team members and the stage becomes much more intense afterward.
The most crucial aspect of the battle against Aladdin is to secure MAG DEF. Aladdin casts his ultimate skill called Third Wish as soon as both teams meet, and the skill deals heavy AoE damage and stuns your team. The skill is almost unavoidable as it is cast even before the team is scattered, so either MAG DEF or a support with AoE healing should be prepared in advance.
If Aladdin’s attack is still fierce even after securing defenses, another way is to have a more aggressive team composition. For example, Richard can decrease PHY and MAG DEF and damage dealers can deal a lot of burst damage. Note that a healing support such as Panacea can still be of a great use in the team against Aladdin’s significant firepower.
On top of that, Aladdin is strong against PHY ATK but is weak against MAG ATK, thus the team should comprise MAG ATK-based heroes. The First Aid car is quite effective against his AoE skill, and the other tactic card can be a damage card or the Hero Time to maximize the ally hero’s firepower.


Be wary of the MAG ATK decrease and AoE petrification - Medusa in Stage 19
Medusa appears as the boss of Stage 19. The average combat power in this stage is around 25,000, but the boss’ combat power is 16,140 which is even lower than Aladdin’s. It may feel less difficult to handle the boss compared to two previous bosses, but the AoE petrification skill should not be taken lightly as this often annihilates the whole team.
Medusa is a support with various CC skills such as a healing decrease debuff and AoE petrification skill. Although her attack damage is relatively low, she possesses the AoE skill that decreases MAG DEF, thus the team needs to spread out.
The best strategy is simply blitzkrieg. Her combat efficiency increases gradually as the battle becomes longer thanks to her skillset that decreases MAG DEF and deals constant damage, inflicts a debuff that decreases healing effects, and petrifies the ally team. Even if you have either Siren or Panacea in the team, if their gear is not as competitive, you won’t be able to have adequate damage and heals, therefore it is better to use other heroes in this case.
You can decrease the damage inflicted on your team if you use Medusa’s preferred target wisely. Her preferred target is the fighter with the highest damage and the closest one to her starting position if there is no fighter in the team. Heroes who can charge towards her and catch her back can be a good choice to minimize the number of heroes being affected by the boss’ AoE skill.
On another note, Medusa’s PHY DEF is weaker than her MAG DEF, thus rangers are much better than mages against her. If rangers are located far from each other, it is more likely that lesser team members will be affected by Petrify, which attacks in front of Medusa in a fan shape.
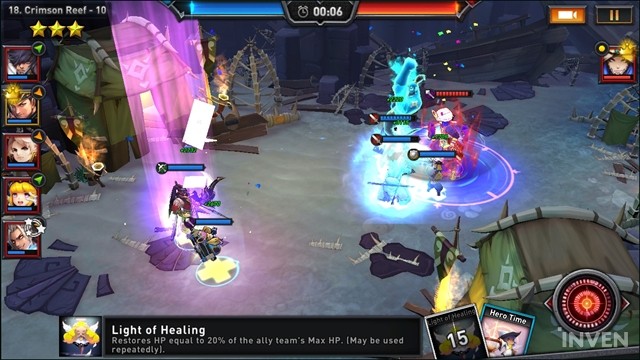
Light of Healing is the most general tactic card you can use. A healer support may not be able to shine because of the boss’ healing debuff, but the tactic card is not affected by this ability and it is extremely efficient for the AoE damage inflicted by Poison Swamp and Petrify. In addition, other tactic cards such as Hero Time and Magic Shield can also be used to increase your team’s firepower.

Not only Bluestones, but Gear Choices as well? Inven Global Returners Commemorative Event


Sort by:
Comments :6
-
0

level 1 madeinshanghai

 Jul 20, 2018
1st!
IGN: Guinevere
Server: Americas -
0
level 1 Brian_Ely
 Jul 20, 2018
Very nice.
Ign: SumDumGuy
Server: America
-
0
level 2 Zerenos
 Jul 21, 2018
Nice guide waitting for next chapter.
-
0

level 1 Khuahn

 Jul 22, 2018
It's good to know that we have alot of information here. Nice! Keep it up!
-
0
level 1 Tyo_Maulana
 Jul 23, 2018
Make me miserable
-
0

level 2 TheKingAtk
 Jul 31, 2018
This Guide very detailed and clearly. This game have a bit hardcore and need a lots Guide like this guide .