Disclaimer: This article contains curated tips, guides, other useful information posted on Inven KR by the users. Please note that such guides and information are not objective truths and may not reflect the latest patch or meta changes.
*Original guide from BDO Inven KR by 봉땅
Class information
- The controls are easy to learn and the class is quite strong, but most skills make the character charge forward and range is relatively narrow
- The movement skills are very slow, as if you are dragging a tire with a rope.
- Difficult to become used to certain moves and skills like the change between pre-awakening and awakening weapons, Promptness, Death Line Chase, sidestep, and side attacks
- Low to Average rank for grinding - strong, but the range is narrow and the skills are generally heavy, making her quite annoying to play against monsters
- Average to High rank for boss fights - high damage, front guard as the super armor, high basic health, and DP with a number of self-healing skills such as Breath of Elion and Purification
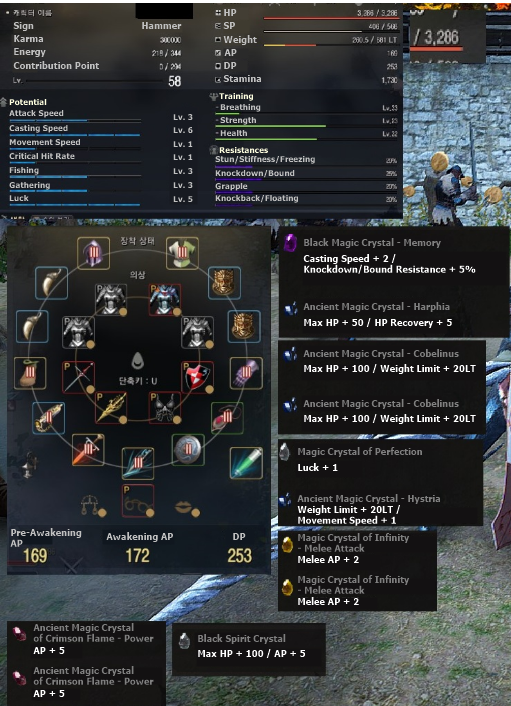
Specification and Crystal settings
Equipments
Weapon
TRI Kzarka Longsword, TRI Dandelion Lancia, and TRI Nouver Shield
The order of acquiring the listed weapons above is as follows:
+15 Yuria Longsword & +15 Axion Shield & +15 Schezeriel Lancia
→ TRI Kzarka Longsword & TRI Axion Shield & TRI Schezeriel Lancia
→ TRI Kzarka Longsword & TRI Dandelion Lancia & TRI Nouver Shield
Armor
TRI Grunil Helmet and Gloves (AP +5), and TRI Armor and Shoes of Hercules’ Might (Weight Limit +150LT)
It is typical to either have 4 sets of +15 armor and enhance them to TRI, or obtain the boss equipment and enhance each to TRI. There is no answer to selecting the armor before PvP, so it is purely up to your own tastes.
Grunil set (the most typical set)
Select 4 armor parts among Grunil × 2, Hera × 2, or Heve × 2 (each offers different effects; AP, Weight Limit, or HP)
Hera × 3 and Zereth Helmet (specialized in Weight Limit)
Grunil × 3 and Bheg’s Gloves (the typical set with accuracy in addition)
Taritas set or Taritas × 3 with Bheg’s Gloves (specialized in DP)
Accessories
TRI Bares Necklace, Blue Whale Molar Earring × 2, Sahazad’s Ring of Monarch × 2, DUO Belt of Shultz the Gladiator
Just like with armor, equip various accessories mainly with high AP until the point where you can equip the final yellow TRI accessories. Below is a cost-effective set:
TRI Bares Necklace or DUO Necklace of Shultz the Gladiator, TRI Witch’s Earring × 2, TRI Mark of Shadow × 2, and TRI Belt of Shultz the Gladiator
Start from the set of 5 Jarettes with a PRI to TRI Rhutum Elite Belt instead of 6 Jarettes, and equip TRI Bares Necklace, PRI or DUO Belt of Shultz the Gladiator, and PRI or DUO Blue Coral Earring or Ring in that respective order, and then finally equip the cost-effective set listed above. This will result in the most effective set without costing too much silver, as you will need to spend silvers for weapons and armor, prior to accessories.
The combinations of Ancient Guardian’s Seal and Ancient Weapon Core, and Red Coral Earring and Ring are also fairly good. However, if you only have a Witch’s Earring and Mark of Shadow that are not enhanced, it is better to sell them, purchase weapons, and equip the set of 4 Jarettes instead.
Socket
Helmet: Memory (Casting Speed) × 2
Armor: Vigor (Max HP) × 2
Gloves: Melee Attack (Melee AP) × 2
Shoes: Swiftness (Movement Speed) and Perfection (Luck)
Weapon: Power (AP)
Shield: Perfection (Luck)
The priority goes as follows: Swiftness lv. 5 > Luck lv. 5 > AP > HP. This is because having Luck lv. 5 in the beginning with a couple of black stones is worth hundreds of cheap crystals.
Pre-Awakening AP 169 + 24 / Awakening AP 172 + 24
+5 Grunil Helmet and Gloves, +4 crystal in gloves, +10 crystal in a weapon, and +5 crystal in a secondary weapon
DP 253 / HP 3286
If you are gearing up for the purpose of raiding Karanda and your DP is around 200, you will likely die a few times. This is because the boss becomes much stronger in the night, you will likely have heavy lag spikes during this time as there are too many people, and the chance of getting killed becomes much higher when hit by an AoE skill.
Even though the DP shown above is 253, it is still recommended to consume the [Party] Elixir of Will. Your HP would still be 1/5 if you get hit by all AoE skills Karanda casts during the night phase. It can be quite dangerous if your HP is not full before AoE skills. The main problem is that you will not be able to loot the boss when you are dead.
Tips for slaying Karanda are as follows:
1. There should be no lag spikes.
In order to slay Karanda, you need a better computer, not higher AP. This implies how laggy the game can become when starting the raid, but the Valkyrie does not need to turn the screen for using skills, and she is still capable of giving heavy damage with simple controls even if there is some lag. This is, of course, based on the Awakening Valkyrie.
To reduce lag, here are the recommended graphic settings; Fullscreen / low graphic / low texture quality / upscale on / other effects off (e.g. the effect, and name of other adventurers, etc.)
Note that the very low texture quality does not show the red mark which indicates incoming AoE skills, so this is not recommended.
2. The constant damage dealing should be simple.
This is what the Valkyrie specializes in. Although the game becomes quite laggy, so much so that the screen moves once every 3 seconds in the Karanda Channel 1 when there are more than 100 players on a weekend afternoon, all you need to do is keep pressing the right mouse button and it provides a considerable amount of damage almost indefinitely with a front guard.
3. The amount of single-target damage should be considerably high.
Valkyrie is top-tier in terms of one-on-one matches without grappling. She is considered a good character to deal with Karanda with relatively lower specs.
Weight 781
When you use the Item Collection Increase Scroll, you need to go to the horse every 20 minutes and visit a village every 1.5 or 2 hours. However, it is not as inconvenient as the Valkyrie does not grind as much as other characters.
Casting Speed 5/5
+3 from Kzarka Longsword and +2 from Crystal in Helmet
The casting speed is crucial and thus level 5 is mandatory.
Critical Hit Rate 1/5
Consume a Serendia Meal to have level 1. Even though the critical hit rate is slightly more important than the casting speed, the character has its own buff and therefore you do not need to increase it for grinding and raids.
Luck 5/5
+3 from the passive buff, +1 from underwear, and +1 from Crystal in Shoes
I personally believe that Luck is quite important as well, so I acquired the maximum Level. In the case where you don’t have underwear, equip Magic Crystals of Perfection in a shield and shoes to reach level 5.
Movement Speed 1/5
+1 from Crystal in Shoes
It’s not necessary for raids. The Adamantine Crystal is recommended for grinding.
Food, elixirs, potions, and hotkeys
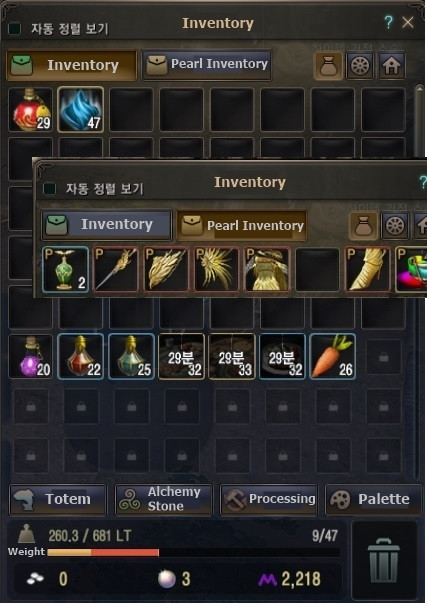
Elion’s Tear
Having 50 potions and 2 Elion’s Tears while waiting for Karanda is recommended.
Foods
When you consume food, it increases health and HP. There is a 30-minutes cooldown for consuming one food, and each has a different duration. The food that the Valkyrie normally consumes lasts for 90 minutes. Therefore, you need to maintain 3 types of food buffs by consuming one every 30 minutes in order to keep the maximum increased health level. Note that you need to be logged in to the game to reduce the cooldown and the buff. The time left remains the same when you are logged in on other characters.
Consume food selectively. Serendia Meal, Milk Tea, and a King of Jungle Hamburg for grinding, and Serendia Meal, Calpheon Meal, and a King of Jungle Hamburg for raids are recommended.
The effects are as follows:
Serendia Meal (AP +5, Accuracy +10, Critical Hit Rate +1)
Milk Tea (Combat EXP Increase +8%, HP Recovery +5)
Calpheon Meal (All Damage Reduction +1, Max HP +100, HP Recovery +5)
King of Jungle Hamburg (Ignore All Resistance +3%, Critical Hit Damage Increase)
Valencian Meal (Ignore All Resistance +4%, Resistance Against All Debuffs +4%, All Evasion +6, Slight Decrease of Damages from Monsters)
Elixir
The Elixir increases the duration of buffs for 8 or 15 minutes, but they are quite expensive compared to food, so newbies shouldn’t use it much. The Elixirs with [Party] in front have a 15-minute duration, and the effect is almost doubled compared to normal ones, thus it is recommended to consume a party elixir even if you are the only one benefitting from it.
Experience Elixir and Elixir of Fury are recommended for grinding, and Elixir of Fury and Elixir of will for raids. There is also a consumable called Melee AP Enhancer, which increases AP slightly, and can be used simultaneously with Elixir of Fury. It is also reasonably cheap. A bit of carrots and potions will suffice.
Hotkeys

The total of 20 slots are usable with extra hotkey slots. It has been awhile since players started using extra slots for food, elixirs, various tools, equipment, and others after the Awakening system was introduced.
The complete skill-chain involves consecutive skill uses without any damage-loss by checking the cooldown of each skill. This is because the front guard, super armor, and CC skills are not activated during the cooldown.
Q and ↓ + Q are taken out for the lack of slots and because these skills don’t have any cooldown.
After Awakened, take out the pre-Awakening skills that overlap the Awakening skills such as Sword of Judgment from the hotkeys. This is because Ultimate: Sword of Judgment can only be activated right after Ultimate: Celestial Spear.
It is important to check the cooldown of both Awakening ↑ + F and pre-Awakening ↑ + F, therefore they are added in the slots.
Elixirs and food can be consumed using only 2 slots.
Put Elixirs in F1, consume it after checking the cooldown, open the inventory right after consumption and put another one into the slot. Do the same for food and put them in F2.
Note that changing the hotkeys of F (kick) and R (interaction) is much more convenient.

Sort by:
Comments :0