There are a total of 14 different weapon types in Monster Hunter: World, and for each weapon, there are proper skill setups that can maximize the weapon's efficiency. The setups differ weapon to weapon, depending on its traits; even if two certain different weapon types are both melee, one of them may rely on attacking when an opening appears, while the other may be more suited for providing a constant stream of damage.
That is why we run simulations in our heads to creatively think up the perfect combinations of armor and decorations. However, making the simulations a reality may prove difficult, as finding the specific jewels that you need is completely dependent on luck. The content of this article will cover armor&jewel combinations for 5 of the 14 different weapon types -- combinations for both early and end-game.
The weapons covered today are:
- Greatsword
- Hammer
- Long Sword
- Charge Blade
- Switch Axe
All five weapons from the list share a similarity; they all pack a very powerful punch, but they also come with a few downsides. These weapons perform best when the target is stationary, so if the monster moves frequently and/or the wielder is constantly disrupted, it'll dish out less DPS compared to the other weapons. Therefore, when using these weapons, it's important to maximize both its attack and the ability to ignore certain disruptions.
The skills that fit well with these weapons are:
- Earplug
ㄴ Not only do you ignore roars but you can make the roar time into an opportunity to deal extra damage.
- Attack Boost
ㄴ The 5% bonus to Affinity at level 4 is very efficient.
- Weakness Exploit
ㄴ This is the most efficient offensive skill in the game.
- Handicraft
ㄴ This is a necessary skill since melee weapon damage depends on the weapon's sharpness. Blue sharpness grants 120% damage while white grants 132%.
- Health Regen Augmentations
ㄴ The weapons introduced today hit hard with a single swing, and so their synergy with the Regen Augmentation is excellent. Of course, taking this skill over more Affinity and/or Attack will give you lower damage per hit; but since you cut some of the time of having to drink potions, the overall DPS will either stay the same or even increase.
■Greatswords & Hammers
- Basic Build (Without Jewels)

▶Earplug 4
▶Handicraft 4
▶Attack Boost 3
▶Weakness Exploit 2
These two weapons may not share the exact same playstyle, but they do share a very big similarity; they dish out the most amount of damage when the target is stationary. Both of them also need to be charged for increased damage -- and that is why the two can function with similar setups.
This is a customization without decorations. In the earlygame, you get an Attack Boost jewel for free. Putting that jewel in any of your equipment will get you Attack Boost 4. You can also reach the highest level for both Earplug and Weakness Exploit if you can find and equip 1 jewel for each skill. If you don't have any Tenderizer jewels, you can swap out the headpiece for DragonKing Eyepatch, swap Kaiser Vambraces to Beta, and add in a couple more Earplug jewels.
This setup is the "basic" and can be used for any melee weapon -- you can swap out a few pieces of armor and/or charm from here to set your build on the direction that you want it to go, such as switching your charm out for Earplug and putting on armor with Attack Boost. This equipment isn't only useful for a Greatsword or Hammer user, but for every melee weapon user in the game.
- Greatsword Expert (Leviathan's Fury)

▶Earplug 5
▶Attack Boost 4
▶Weakness Exploit 3
▶Speed Sharpening 3
▶Focus 2
▶Handicraft 2
▶Protective Polish 1
This is an appropriate lategame build that is built off the one shown above -- specialized for the popular greatsword, Leviathan's Fury. Due to Protective Polish, the weapon will retain its sharpness for a fixed amount of time -- and we've taken Speed Sharpening 3 to maintain that status for as long as possible. The reason we only took 2 in Handicraft is that 2 points are enough to bring the weapon to white sharpness. And finally, charging your weapon is important for greatsword and hammer users, so the remaining points will be put on Focus.
- Hammer Expert (Diablos Shatterer 2)
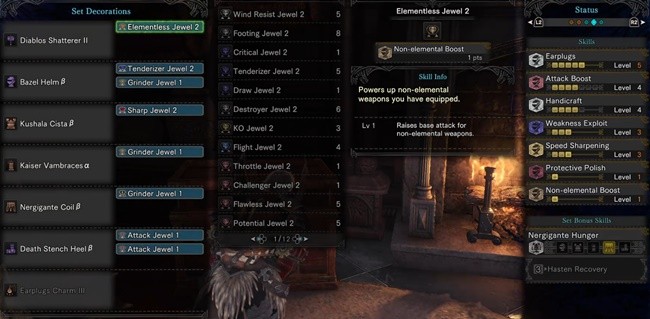
▶Earplug 5
▶Attack Boost 4
▶Handicraft 4
▶Weakness Exploit 3
▶Speed Sharpening 3
▶Protective Polish 1
▶Non-Elemental Boost 1
This is a build for the hammer that packs the hardest punch in the game, the Diablos Shatterer 2. With the 4 levels in Handicraft, we'll be able to just barely reach white sharpness for the weapon; and to make it last, taking Speed Sharpening and Protective Polish will be essential.
■Long Swords
- Basic Build (Without Jewels)

▶Earplug 4
▶Attack Boost 3
▶Weakness Exploit 3
▶Flinch Free 1
The goal of this weapon is to chain combos without being interrupted -- as the core of the long sword is to consecutively combo the Spirit Blade attacks to buff and maintain that buff on your weapon. If the chains are disrupted and canceled, you'll face a large DPS loss.
As there are no jewel requirements, this is an easy build to achieve. The Flinch Free skill will allow you to ignore small attacks from the monster, and at level 1, you'll ignore most of your teammates' attacks as well. The reason why Earplug is left at level 4 is that you can easily achieve 5 by finding 1 jewel for it. This early setup will allow you to complete the build at a quick pace as the jewels required are relatively easy to get.
-Expert (Divine Slasher)
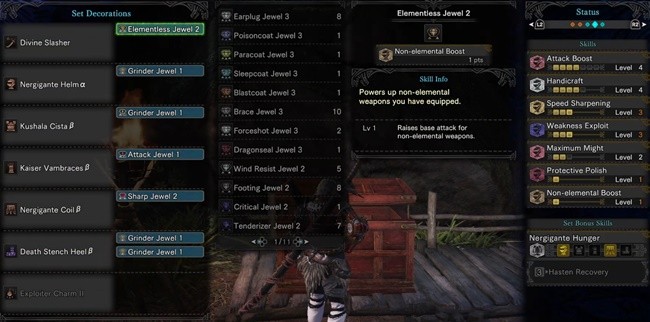
▶ Attack Boost 4
▶ Handicraft 4
▶ Speed Sharpening 3
▶ Weakness Exploit 3
▶ Maximum Might 2
▶ Protective Polish 1
▶ Non-Elemental Boost 1
This is a setup that is built around the most popular long sword, Divine Slasher. This weapon will only reach white sharpness if you put 3 points into Handicraft, so like the earlier builds, this build will utilize Protective Polish to maximize damage. The reason why Flinch Free is taken out is that, if you reach this point in the game, you'll have a much easier time playing safely and reliably with Foresight Slash and/or proper positioning. This build is highly offensive with the lack of Earplug, but the endgame goal of the long sword is not to tank and endure but to counter-attack. This is a build that tries to optimize the weapon's strengths.
■ Charge Blade
Currently, the charge blade is regarded as the best weapon in the game -- the reason being its Super Amped Element Discharge (SAED); an attack that deals an incredible amount of damage. At its full build, a SAED pops 6 phials on its activations, and it pulls 100 damage per phial. The damage calculation of these unique phials are different to the other damage sources in the game, so the build for the charge blade will slightly differ from the other weapons.
-Basic Build (Without Jewels)
▶ Focus 3
▶ Artillery 3
▶ Attack Boost 2
▶ Weakness Exploit 2
▶ Capacity Boost 1
The core of the charge blade is in Focus, Artillery, and Capacity Boost. Focus will allow you to charge up your phials quickly with your basic attacks. Artillery will increase the damage of your phials, and finally, Capacity Boost will increase the number of said phials. The main problem with this build is that its extremely difficult to find the corresponding jewels for these skills, so the best method will be to get these skills on your basic equipment and find jewels for the remaining skills. Also, affinity will only affect your basic attacks and not your phials, so affinity will be of less importance to this build, especially when compared to the other weapons.
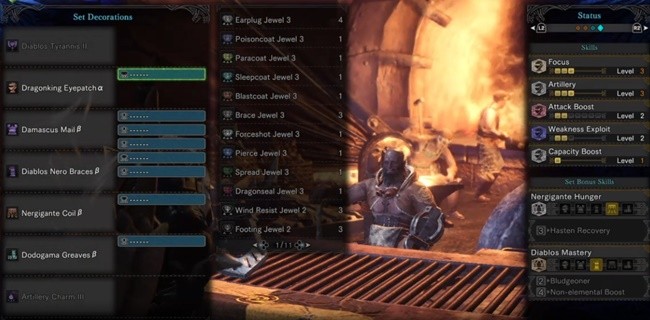
- Expert (Diablos Tyrannis 2)
▶ Earplug 5
▶ Attack Boost 4
▶ Focus 3
▶ Artillery 3
▶ Weakness Exploit 2
▶ Capacity Boost 1
▶ Non-Elemental Boost 1
▶ Handicraft 2, Flinch Free 1, Etc
This is a build that requires you to find all the necessary jewels. The big advantage of using this build is that you have the freedom of choice to pick whichever greaves you want to equip. If you need Flinch Free, equip Xeno's. If you are looking to grind Vaal Hazaak, wear his equipment.
■ Switch Axe
The Switch Axe is in some ways, the most unalike weapon in this list. As a matter of fact, this weapon is closer to the Insect Glaive than anything else here. This weapon has an ultimate-like ability called Element Discharge, but in actuality, it's a pretty pointless skill -- in fact, you're better off staying in your sword form for optimized DPS.
- Basic Build (Without Jewels)

▶ Earplug 5
▶ Attack Boost 4
▶ Weakness Exploit 3
In truth, this is a compact setup that is usable with most other weapons as well. At this point in time, it is recommended to use Dying Light (Created from Nergigante parts) with the reason being that it has a near max level of blue sharpness; so we won't have to worry about Handicraft or Speed Sharpening.
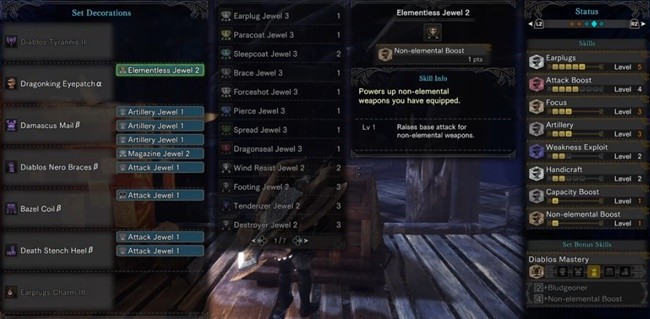
- Expert(Axe of Demons)

▶ Earplug 5
▶ Handicraft 4
▶ Weakness Exploit 3
▶ Speed Sharpening 3
▶ Maximum Might 2
▶ Protective Polish 1
▶ Non - Elemental Boost 1
This build will be using Earplug to prevent as much interruption as possible and allow for continuous attacks. Although Attack Boost is taken out, due to the high attack rating of the Axe of Demons, your overall DPS won't drop by a noticeable amount. If you want a more offensive build, you can always swap your charm and the Bazel Coil for the Attack Boost Charm and Nergigante Coil.
4 levels of Handicraft will guarantee white sharpness on your weapon. So with Protective Polish, you'll be able to maintain white sharpness throughout the fight.


Sort by:
Comments :5
-
0
level 1 Scoots_Effd

 Mar 10, 2018
2
The switch axe not switch blade or sa for short has a high range of motion and area reach. I've been maining it since its release in 3.
It is a weapon of full offense power giving up defense for damage capabilities. Ill give my 2 cents for the switch axe.
Both the axe and sword mode have there pros and cons.
Axe form:
Pros: high reach with upward attacks
Wide reach with somewhat fast attacks for a large weapon that can lead to
A potential infinite combo depending in your stamina bar (don't forget to bring your dash juice)
This form is better for doing more hits then damage (better part breaking)
Cons: no blocking capability
Getting out midcombo can be difficult when a monster takes aim
In this form you can cancel other players moves
-------
Sword form:
Pros: higher damage potential due to this form having the elmentals/status
Elemental Discharge: great for trying to afflict status or pesuo-mounting.
Cons: no blocking capabilities
Each swing uses part of your charge bar regardless if you hit or not.
Both your moving speed and attack animations are slow.
------
Tips: you can draw out from sword mode while sheeth as you draw your weapon immediately push the transform buttons while attacking. (In game it leads to an attack swing. Outside game you look like a button mashing spaz)
While on a downward slope while sliding pudding the triangle or y button I believe (sorry Xbox people I have it on ps4 the top attack) will have you swing at the ground to get some air to attempt to mount a monster.
Wide swing in axe mode can be used to get people out of sleep or stun.
You can send people up in the air with you o +triangle (x+ y for Xbox I believe) it can be used to get people out of the way or to help them mount.(if you push attack while airborne from this you can attack and not have a I need to get up animation and if timed correctly can attempt to mount)
When going for the infinite combo if you attempt to transform into sword mode you will meteor swing which leads to a sword slash. The second part of the axe swing does a tramenous amount of damage if hits.
Pesuo-mounting. Attacking in sword mode gives you another bar along your charge bar. (A complete connecting elemental discharge fills it up faster)(the elemental discharge only uses the charge bar for the first discharge and last now) once this second bar is filled if you do a elemental discharge you will hop on the monster and discharge the energy (doesn't count as a mount) completion of it will at minimum make the monster stammer or at best fall down (I personally love to kill a monster with a discharge noting says oh shit like making your sword explode in a monsters face and or anus) higher rank sa can do it multiple times before the second bar goes out.
But will probably need to be reloaded to do so.
-
0
level 1 Scoots_Effd
Mar 10, 2018
@Scoots_Effd This is just from a sa main point of view. Love or hate what I'm saying.SA are good weapons for people who like a more aggressive gameplay and learned monsters moves. The way you reduce incoming damage is to not take any by dodgeing. (I sense sarcasm) but like I said earlier the sa has given up its defence for offense. -
0

level 1 Laffa
 Mar 10, 2018
@Scoots_Effd
Mar 10, 2018
@Scoots_EffdThere were some issues while writing the article because some of the texts from MHW are different, from the English version of the game to the ones from Asia. Thank you for pointing it out, however, as we've fixed the article accordingly. :)
-
-
0

level 1 Saloon007

 Aug 26, 2018
Woohyun always gives the best and informative articles I wish i could meet him IRL~
-
0
level 1 Whatever123
 Feb 25, 2019
So I was looking for some different views on Greatsword builds, since I started a new character who I wanted to solely focus on Greatswords and a bit of Charge Blade.
I'm heavily disappointed, that this guide is so far up in the google results. You don't need any amount of earplugs on Charge Blade/Lance/Greatsword/Longsword etc., because all of them can already negate roars.
Shoulderbash, foresight, guardpoint - that's what you do, since that serves the same purpose, frees up your armor choices A LOT and in most cases is even extra beneficial, considering guard-pointing correctly lets you SAED, foresight gives you a free spirit level and bash lets you sometimes knock-out or topple monsters like Nergi or Jho.
The only weapons I could see Earplugs useful for are those that don't have natural evasion abilities, but even with those you can evade roars, although that requires much more precise timing. So something like the Switchaxe or maybe Insect Glaive could make use of Earplugs, but even then you're probably better off either learning the correct dodge timing or positioning yourself in a way you know won't get you caught.
TL;DR: Don't waste slots/armor on earplugs.