Related Article: MHW: Early and End-Game Builds For Greatswords, Hammer, Longswords, Charge Blade, and Switch Axe
Continuing from the previous article, I'm here to introduce more early and end-game builds for more weapons. The 5 weapons that this article will cover have a different playstyle to those from the previous article -- you'll rely on landing quick, repeated strikes rather than slow, strong ones. Don't be discouraged by the small individual damage numbers, as the small numbers will rack up and give you a solid DPS number in the end.
The weapons this article will cover are:
- Sword & Shield
- Dual Blades
- Insect Glaive
- Lance
- Gunlance
The lance and gunlance require a different fighting style to that of the other three, and it will be explained below.
The skills that fit well with these weapons are:
- Attack Boost
ㄴ The 5% bonus to Affinity at level 4 is very efficient.
- Weakness Exploit
ㄴ This is the most efficient offensive skill in the game.
- Handicraft
ㄴ This is a necessary skill since melee weapon damage depends on the weapon's sharpness. Blue sharpness grants 120% damage while white grants 132%.
- Protect Polish
ㄴ After sharpening, this skill will reduce sharpness loss for a set amount of time. The weapons covered today either hit fast or reduce a lot of sharpness upon each hit, so Protect Polish is a valuable skill.
- Speed Sharpening
ㄴ This skill will be used in conjunction with Protect Polish. At level 3, this skill will drastically reduce the time needed to fully sharpen your weapon.
■ Sword & Shield
- Basic Build (Without Jewels)
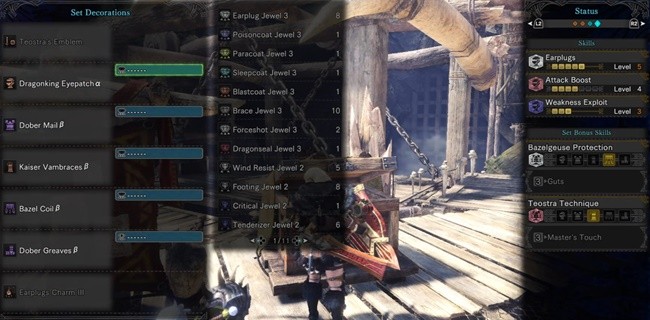
▶ Earplug 5
▶ Attack Boost 4
▶ Weakness Exploit 3
Earplug isn't a required skill for the S&S, but with the lack of jewels early on, there really isn't any better options. In addition, to beginning players, Earplug can actually be very useful. This build is simply a stepping stone -- a simple pit stop before switching out parts to optimize the build.
- S&S Expert (Eradication Vanguard)

▶ Attack Boost 4
▶ Critical Boost 3
▶ Weakness Exploit 3
▶ Maximum Might 3
▶ Critical Eye 2
Once you have or nearly mastered the S&S, it becomes easy to completely avoid taking damage through dodging, item usage, and/or through its limited guarding. Therefore, you can go fully offensive on your build without too much concern. This setup will grant you 91% Affinity, and thanks to Critical Boost, your damage from Crits will increase further. Also, the most important thing to remember will be to take 2 pieces of Rathalos Mastery for Critical Element. S&S highly benefit from elemental damage, so you can fully optimize your attack potential by building around it. Putting on Rocksteady Mantle and Health Regen Augmentations on top of this build will allow you to quickly take down your target.
- Support Build
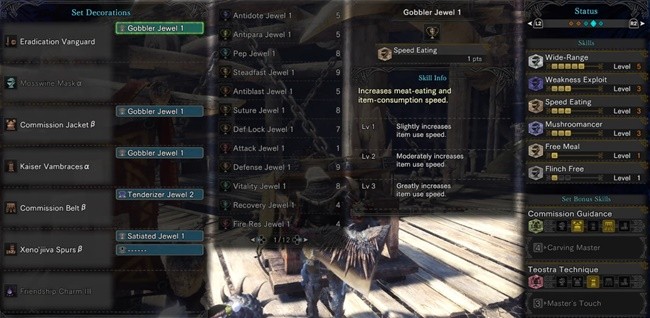
▶ Wide Range 5
▶ Weakness Exploit 3
▶ Speed Eating 3
▶ Mushroomancer 3
▶ Free Meal 1
▶ Flinch Free 1
▶ Etc
This is a support build that takes advantage of the fact that S&S allows the user to freely use items at will. As for the choice of weapon, you can either use a weapon with paralysis or sleep -- as a matter of fact, you can pretty much use whichever weapon you want. The focus of this build is to buff your teammates with Mushroomancer and use Blue Mushroom with your 3 types of potions. Nulberry and Herbal Medicine also affect your entire team when taken, so keep in mind that you can clear away your teammates' ill status ailments. If you're facing against Vaal Hazak, switch your legs to Vaal Hazak Greaves β and equip a Miasma Jewel.
■ Dual Blades
- Basic Build (Without Jewel)

▶ Earplug 5
▶ Attack Boost 4
▶ Weakness Exploit 3
This is the exact same setup as the S&S Basic Build. However, compared to the S&S, Dual Blades actually benefit a lot more from Earplug -- the reason being, its unique 'Demon Mode' system. When Demon Mode is active, it slowly drains away your stamina until its deactivated. Therefore, you'll need to make the most of your time during that duration. Getting interrupted by a roar while attacking in this state can leave you stamina-less after. But again, this build is meant to be a stepping stone, so you won't need to strain yourself over it.
- Dual Blades Expert (Fire and Ice)

▶ Earplug 5
▶ Attack Boost 4
▶ Weakness Exploit 3
▶ Speed Sharpening
▶ Handicraft 2
▶ Protective Polish
▶ Etc
This is a build that barrages the target with explosive, fire, and ice damage. With 2 levels in Handicraft, although barely, you'll reach the white sharpness on this weapon. Although the only attack boosting skill is Attack Boost and Weakness Exploit, due to the DB's already high attack rating, it won't be detrimental to you in the long run. In the empty level 3 socket, you can fit in whichever skill you want.
- Dual Blades Expert (Decimation Claw)
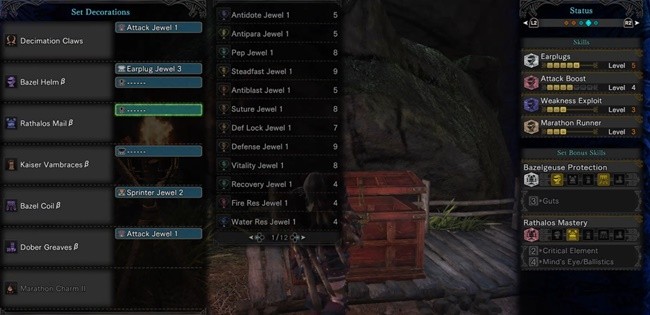
▶ Earplug 5
▶ Attack Boost 4
▶ Weakness Exploit 3
▶ Marathon Runner 3
▶ Etc
Due to the weapon's high sharpness, you won't need to frequently sharpen these claws. Therefore, this setup is built around that idea; only taking necessary skills. In addition, two level 1 jewel sockets and one level 3 jewel socket remains open for you to take whichever skill you want. If you want more survivability you can add in Divine Blessing or health. For more damage, you can put in either Attack Boost or Expert Jewel. Although Marathon Runner isn't a required skill, it drastically increases the duration of your Demon Mode, so it's a very effective skill for DB users.
■ Insect Glaive
- Basic Build (Without Jewels)

▶ Attack Boost 3
▶ Weakness Exploit 3
▶ Blight Resistance 2
▶ Power Prolonger 2
▶ Flinch Free
Instead of landing flashy combos, it's more important for Insect Glaive users to apply and maintain the buffs provided by the insects. The red buff that is provided by extracting from the monster's head boosts your damage, and the damage difference between having the buff or not is quite large to ignore. But since maintaining the said buff could prove difficult for new players, taking Power Prolonger can give you an easier time as it'll increase the duration of the buff. Lastly, since the Insect Glaive is a fast, repeatedly hitting weapon, the build is outfitted with the Xeno'jiiva armor to have an easier time maintaining the weapon's sharpness.
- Insect Glaive Expert (Catastrophe's Light)

▶ Attack Boost 4
▶ Weakness Exploit 3
▶ Power Prolonger 3
▶ Constitution 3
▶ Flinch Free 2
▶ Airborne 1
▶ Etc
This is an extension of the basic Xeno'jiiva build above. To maximize decorations usage, some of the armor parts have been swapped out, and therefore, this build won't have Blight Resistance. We've also taken Constitution, as the Insect Glaive drains a considerable amount of stamina when attacking. However, if you want to focus more on damage, you can go ahead and use a more offensive charm. You can also take Airborne to increase your damage while up in the air. The big advantage of this build is that there are three level 1 jewel sockets for you to personally customize.
■ Lance
- Basic (Without Jewels)

▶ Guard 5
▶ Weakness Exploit 3
▶ Partbreaker 3
This is a build that'll get you familiar with the lance. To begin, the lance is a weapon that is specialized in having a strong defense and attacking the enemy's weak parts. With 5 level into Guard and 3 parts of Uragaan armor, you can block any attack and take no damage. Once you become familiar with the weapon, you can start swapping out parts for a more advanced build.
- Lance Expert (Garon Dhara 2)

▶ Attack Boost 4
▶ Weakness Exploit 3
▶ Latent Power 3
▶ Guard 3
▶ Maximum Might 1
▶ Guard Up 1
▶ Non-elemental Boost 1
This setup uses the most widely used lance in the game, Garon Dhara II. By using Teostra's armor set bonus, this setup completely removes the need to sharpen your weapon. Through Augments, you can hit 40% Affinity with the weapon alone -- adding Weakness Exploit 3 and Maximum Might 1 will get you to exactly 100%, allowing you to maintain white sharpness throughout an entire fight if you are able to only hit a monster in its weak spot. Garon Dhara's overall damage may seem like it's on the lower side, but with the Elementless Jewel and white sharpness, its actual attack rating isn't too bad.
■ Gunlance
- Basic Build (Without Jewel)

▶ Weakness Exploit 3
▶ Artillery 3
▶ Partbreaker 3
▶ Guard 2
This build is similar to the lance's basic build -- with the only difference being the charm. There are two types of playstyle for gunlance users. One, there is a build that is specialized for fighting with just the lance; barely ever firing the "gun" part of the lance. On the other hand, there is a "full burst" setup that utilizes the gun as much as possible. The basic build is... neither, but it'll be a good start for those who want to try the weapon. Gunlance's skill setup is very specific and different from the other weapons, so to use the weapon to its fullest, you'll need to find the optimal equipment and decorations.
- Expert (Eradication Flame)

▶ Attack Boost 5
▶ Weakness Exploit 3
▶ Agitator 3
▶ Guard 3
▶ Maximum might 3
▶ Quick Sneath 1
▶ Guard Up 1
This is a setup that minimizes gun usage and more on physical strikes. Due to the weapon's high attack rating per hit, you can simply block and attack throughout an entire hunt and expect good DPS. While playing with this build, you have to resist the urge to fire your gun, as it'll eat up a lot of your weapon's sharpness. Think of the weapon as a greatsword with a shield...
- Expert (Royal Burst)

▶ Earplug 5
▶ Handicraft 4
▶ Artillery 3
▶ Speed Sharpening 3
▶ Quick sneath 2
▶ Capacity boost 1
▶ Flinch Free 1
▶ Protective Polish 1
This is a "Full Burst" build utilizing Royal Burst, a gunlance that can load up 5 rounds. With this build, Full Burst will be your main attacking skill -- so you'll want to further increase its damage with Artillery and Capacity Boost. Finding the jewels for these two skills are quite difficult, so in place, you can craft equipment with Dodogama parts until then. The reason we take Handicraft is that, whenever you fire your weapon, it takes a chunk of your sharpness -- it drains twice the amount of sharpness as you'd drain from a normal hit. That is why Speed Sharpening and Protective Polish is a necessity.


Sort by:
Comments :1
-
0
level 1 McKnoe3z

 Apr 22, 2018
Thanks, i'll be trying those set up. Good hunt.