Disclaimer: This article contains curated tips, guides, other useful information posted on Inven KR by the users. Please note that such guides and information are not objective truths and may not reflect the latest patch or meta changes.
*Original guide from BDO Inven KR by 봉땅
Awakening: Holy Lancia Skill Tree
1. Skills acquired from quests: Awakening: Holy Lancia, Noble Spirit, Strong Defense, Death Line Chase, and Sacrum Ferit
2. Mandatory pre-Awakening skills: Ultimate: Celestial Spear, Ultimate: Sword of Judgment, Fitness Training, Infinite Mastery, Skilled Hunter, Ultimate: Righteous Charge, Shield Chase, Breath of Elion, Heaven’s Echo, and Elion’s Blessing
3. Distribute skill points to the ones that are often used in PvP:
Promptness, Sacrum Ferit, Castigatio, and Blitz Stab → Purificatione, Breath of Elion, and Hastiludium → Wave of Light, Sanctitas de Enslar, and Verdict: Lancia Iustitiae
4. Distribute the remaining points selectively or save them for later use:
Lancia Training, pre-Awakening Forward Slash, Sideways Cut, Vow of Trust, optional pre-Awakening skills

Awakening: Holy Lancia (C)
This allows for transition between a normal weapon and an Awakening weapon. Press C while switching from a normal weapon to an Awakening weapon in order to deal massive damage. The most frequently-used combinations are as follows:
Celestial Spear (↓ + E) → Promptness (Space);
Celestial Spear (↓ + E) → Ultimate: Sword of Judgment (↓ + R click) → Promptness (Space);
Forward Slash (↑ + L click) → Promptness (Space); and
Sideways Cut (← + L click) → Promptness (Space)
In the case of switching from an Awakening weapon to a normal weapon, it is safe to use [↑ + C] in a non-combat mode, and [←], [→ + C] in a combat mode, Shield Chase (←, → + Shift) or Death Line Chase (↓ + Shift) during Awakening: Holy Lancia are used more often.
Noble Spirit (E)
The only combat-related effect is the 10% increased casting speed for 30 seconds.
Each character has its own specialization effect hotkey such as [E], [Shift + E], or [Shift + Q], and it is recommended to lock the command and assign a specific hotkey to specialization effects for those who have a number of characters (number 3 in case of Valkyrie). Having Elion’s Blessing, the pre-Awakening buff, on the number 4 allows for more convenient combinations. Please refer to the UI setting attached in the middle of this article for easier understanding. Use it when the grinding route is long. Do not worry about the cooldown and just use them when the cooldown timer ends. It is a must to activate in prior to starting boss raids, hence the skill should be placed in a visible spot.
Strong Defense (Q)
The skill increases all defense by 20 points for 10 seconds while keeping the Guard stance.
Do Heaven’s Echo and Strong Defense overlap each other? Heaven’s Echo (Space) can be activated quickly during the Guard stance, and this skill also has a 20 point increased defense for 60 seconds. However, the 20 points from Strong Defense and 20 from Heaven’s Echo do not stack up to 40. When the skill is casted, Strong Defense’s 20 increased defense for 20 seconds becomes renewed with 20 additional defense for 60 seconds. Most buff systems in BDO only renew the duration of skills that have the same effects. In other words, the increased defense buff by 20 for 60 seconds is maintained when Heaven’s Echo (Space) is activated right after Strong Defense (Q).
Heaven’s Echo also taunts surrounding monsters. The skill alone is not good enough, and you need the combo to fully taunt and maintain aggro of monsters, even if the damage of other players is enormous. The combo is as follows:
Strong Defense (Q) → Heaven’s Echo (Space) → Heaven’s Echo (Space) → normal attack for 2 to 3 seconds → Heaven’s Echo (Space) → Heaven’s Echo (Space)
When you are against a high-levelled monster, it is good to use Heaven’s Echo every time you activate Strong Defense. In cases where the world boss is not focusing on you because of your weak damage, it is okay to use the skill as one of your defense buffs.
When you are against Awakened bosses such as Awakened Giath or Bheg, the boss will focus on you only with the repeated combo of Heaven’s Echo and a couple of normal hits during Strong Defense. This allows other party members to dish out damage at the back of the boss.
Guard (Q), the pre-Awakening skill, also has the effect of increased defense by 20 for 20 seconds. The duration is the same as Strong Defense, but the effects can stack with each other and make 40 in total. Although not frequently used, you can maintain 40 points of additional defense infinitely, so it would be worth to have them as part of the combo.
Death Line Chase (↑ + Shift or ↓ + Shift)
[↑ + Shift] is the basic combination of Death Line Chase. Give a short pause each time by pressing Shift intermittently while pressing [↑]. It is same with Promptness (Space).
The forward Death Line Chase (↑ + Shift) → Promptness (L click) may seem simple, but it costs a significant amount of stamina, thus is not cost-effective in terms of movement distance, and is not recommended for repeated use. Use it only for moving short distances.
The repeated use of the forward Death Line Chase (↑ + Shift) → Promptness (L click) → Promptness (Space) is an Awakening movement skill. This combination may be used just 3 to 5 times due to its stamina consumption. It allows the character to move to the side of monsters, but is not ideal for any other purpose. The animation of Promptness with L click is not a normal attack, but is instead a piercing attack.
When Noble Spirit (E) is on cooldown, you need to switch to the pre-Awakening status for longer sprinting. The usual fast and convenient movement combination is as follows:
Forward Death Line Chse (↑ + Shift) → Promptness (L click) → Promptness (Space) → Switch to a normal weapon (↑ + C) → Righteous Charge (↑ + F) → Forward sprint (Shift + ↑)
[← + Shift] and [→ + Shift] are not the sideways Death Line Chase, but activate Shield Chase. Each Shield Chase Ⅰ, Ⅱ, and Ⅲ are different from one another, allowing them to be used almost simultaneously with different cooldowns. They are therefore frequently used for grinding, evading during raids, moving, and getting behind an opponent. The combo is as follows:
Sideways Shield Chase Ⅰ (← + Shift) → Front Shield Chase Ⅱ (↑ + Shift) → Front Shield Chase Ⅲ (↑ + Shift) → Promptness (Space)
When you are in the Lancia form and keep pressing [↓ + Shift] to use the backward Death Line Chase, it activates the backward Death Line Chase → Backward Shield Chase Ⅰ → Backward Shield Chase Ⅱ → Backward Shield Chase Ⅲ. This is for a long-distance evasion. You can use this to quickly evade Karanda’s AoE skill, which activates in the center of the place after a second of sitting still and falling down from above, by continuously pressing [↓ + Shift]. Note that it is much better to activate the Guard (Q) and consume a potion if it is too late to avoid the AoE skill, as you would become stiffened nonetheless and the heals from Elion’s Blessing would be too late.
Most Lancia skills make the character charge forward and have a narrow hitbox, making her charge into the middle of monsters. Whether or not the monsters are resistant to CC, your character usually charges into the midst of a pack, which leads to you being surrounded. Even if you turn your direction using skills like Sacrum Ferit (R click) or Blitz Stab (↑ + R click), they would just rend the air without hitting monsters that are right in front of you.
The following combination would resolve this issue and can be used for the purpose of securing a spot while grinding:
Backward Death Line Chase (↓ + Shift) → Backward Shield Chase (↓ + Shift) → Promptness (Space) → Guard (Q) → Heaven’s Echo (Space). In particular, the Guard (Q) right after the Promptness (Space) would allow you to reposition yourself with the super armor from Promptness and front guard from Guard, even if you are surrounded by monsters. You can resume the usual combination to deal damage after receiving the defense buff from Heaven’s Echo (Space).
Lancia Training (L click)
Movement speed +10% for 10s on hit at level 56
Movement speed +15% for 10s on hit at level 57
Movement speed +20% for 10s on hit at level 59
The first level is automatically learned when you complete the Awakening at level 56, allowing faster movement speed by 10% for 10 seconds.
A considerable amount of skill points is needed to max it out, but it is recommended to follow the skill tree shown above and distribute points to Lancia Training when you have spare points. If you use the on-hit movement buff on hit, it is good to max out this skill first.
When you are out of SP and/or just want to use Promptness, the combination of forward Death Line Chase (↑ + Shift) with Promptness (Space) is often used. The combo of normal attack (L click) with Promptness (Space) is useful to cast Promptness without moving. The repeated use of the on-spot Promptness is done by left clicking while pressing spacebar.
Castigatio (↓ + L click)
The range is wider than Sacrum Ferit. All three levels of the skill have the effect of down attack which instantly kills almost any weak monsters - Castiatio with down attack is better than Sacrum Ferit.
The skill has a long delay if you use it on its own, thus it is better to use Promptness (Space) prior to Castigatio Ⅰ, Ⅱ, and Ⅲ (↓ + L click) in order to avoid the delay. The combination of Celestial Spear (↓ + E) followed by Sword of Judgment (pre-Awakening ↓ + R click), Promptness (Space), and Castigatio Ⅰ, Ⅱ, and Ⅲ (↓ + R click) in that order will perform down attacks.
However, it is not useful against bosses, and Sacrum Ferit is better in this case.
Sacrum Ferit Ⅰ and Ⅱ, and Flow: Lucem Fluxum (R click)
The combo is quite easy and it goes as follows:
Sacrum Ferit Ⅰ (1st pierce after a shield bash followed by front guard) → Sacrum Ferit Ⅱ (2nd pierce while charging forward) → Flow: Lucem Fluxum (3rd pierce while jumping and charging forward, knocking down the opponent)
Unlike other skills that knock down monsters where they stand, Flow: Lucem Fluxum scatters monsters away in a fan shape. The combo of Sacrum Ferit Ⅰ (R click), Sacrum Ferit Ⅱ (R click), Flow: Lucem Fluxum (R click), and Promptness (Space) prevents monsters from being scattered away and stiffens them where they stand. Promptness is a must-use skill after Flow: Lucem Fluxum during grinding.
You can cast Sacrum Ferit Ⅰ and Ⅱ quicker with other skills used straight after them. Sacrum Ferit Ⅰ and Ⅱ (R click) followed by Righteous Charge (↑ + F) charge forward after the shield bash and both perform front guard. The combo of Sacrum Ferit Ⅰ and Ⅱ (R click) and Blitz Stab (↑ + R click) allows you to use Blitz Stab smoothly without delay.
Righteous Charge (↑ + F)
As explained before, use the skill after Sacrum Ferit Ⅰ or Ⅱ. The combo of Righteous Charge (↑ + F) followed by Blitz Stab (↑ + R click) allows the instant cast of Blitz Stab without delay.
Blitz Stab (↑ + R click)
Blitz Stab (↑ + R click) with Promptness (Space) prevents monsters from being knocked back and stiffens them where they stand. Promptness after the effect of knockback is a must during grinding.
Purificatione (Shift + L click) and Breath of Elion (Shift + E)
The purpose of Purificatione during raids or grinding is for the front guard and HP recovery every 10 seconds. Use in between the combination when you need to recover HP instead of using it at every cooldown. Note that it is wise to use it to stiffen or cancel the opponent’s casting during PvP.
Use Purificatione before a potion for grinding, and a potion before Purificatione for raids - use the skill only when a potion is not sufficient enough. This is because the usage of the skill creates damage loss and brings your character further from loot if you use the skill at every cooldown. Bring about 10 potions only as a backup for grinding.
Use Breath of Elion if the situation has become more dire. Note that the Valkyrie does not bring a Purifying Water like the Witch, since one cast of Breath of Elion would suffice when you are travelling across the desert on a camel.
Wave of Light (↓ + F), Sanctitas de Enslar (F), Verdict: Lancia Iustitiae (Shift + R click)
This is called the 100% Black Spirit combination. The separate use of each skill is not recommended for the following reasons - it is not recommended to use Sanctitas de Enslar just to move towards monsters; the use of Verdict: Lancia Iustitiae on its own slows down the grinding pace; and Wave of Light may be good for gathering monsters in a group but the cooldown is relatively long for that purpose.
Note that Sanctitas de Enslar (F) makes the character jump down on an opponent that has the center-screen target marker pointing at it. The character may end up landing quite farther than expected, so move the dot to aim properly.
Lancia Specialization

The most recommended Awakening specializations are as follows:
Promptness with All Casting Speed +4% for 5 sec. for self and 20 HP recovered per hit (i.e. 2 hits = 40 HP × the number of opponents) at level 56; and
Blitz Stab with Attack against monsters +25 for 8 sec. for self and 10 HP recovered per hit (i.e. 6 hits = 60 HP × the number of opponents) at level 58
Even though Blitz Stab is 5 more attack points against monsters than Celestial Spear, this is considered a better choice for the following reason. When the duration of 25 attack against monsters of Blitz Stab has 2 seconds remaining, the use of Celestial Spear with 20 attack points against monsters does not renew the duration to 8 seconds and the original time of Blitz Stab ends. That is, you have no additional attack points against monsters for a few seconds.
Promptness with faster casting speed by 4% for 5 seconds is mandatory. The effects of HP recovery with Promptness and Blitz Stab are considered a slight lifesteal that support Purificatione and Breath of Elion. This is useful as the grinding style of the Valkyrie is charging forward with Promptness, piercing through the pack of monsters and deal gradual damage over time.
Optional specializations can be:
Castigatio: Attack against monsters +20 for 8 sec. for self / All Defense +15 for 10 sec. for self
The defense increase nullifies the effect of Sword of Judgment and renews the effect, however it is not used against bosses.
Purificatione: All Casting Speed +4% for 5 sec. for self / All Movement Speed +4% for 10 sec. for self
Whereas Promptness is used almost more than once every 5 seconds, the effect of casting speed is overlapped, and the movement speed increase is not good enough.
Sanctum Ferit: Instantly Recover 10 HP per hit (i.e. 7 hits = 70 HP × the number of opponents) / All Evasion +4% for 10 sec. for self
The evasion effect nullifies and renews Sword of Judgment. It may be effective for those who use Celestial Spear followed by Promptness and right click, to manage their HP.
If you intend to use Castigatio to maintain the effect of attack against monsters +20 indefinitely,
As explained before, you have no additional attack points against monsters for a few seconds when you use Blitz Stab over Celestial Spear. Because of this, some would prefer to maintain 20 additional attack points against monsters. You just need to alter a few bits of specializations in this case:
Level 50 Celestial Spear: Attack against monsters +20 for 8 sec. for self / All Critical Hit Rate +20% for 9 sec. for self
Level 52 Sword of Judgment: All Accuracy +3% for 12 sec. for self / All Evasion +3% for 10 sec. for self
Level 54 Righteous Charge: All Casting Speed +10% for 5 sec. for self/ All Attack Speed -10% for 7 sec. for target
Level 56 Promptness: All Casting Speed +4% for 5 sec. for self / Instantly Recover 20 HP per hit
Level 58 Castigatio: Attack against monsters +20 for 8 sec. for self / All Defense +10 for 15 sec. for self
Lancia Combo
Visit Kzarka after the Awakening at level 56 and and then ultimately aim for Sausan. The Lancia combo for raids and grinding are not that different to each other, thus we will see the raid combination first, followed by the grinding one. Images below show the pre and post-status of the use of combination.
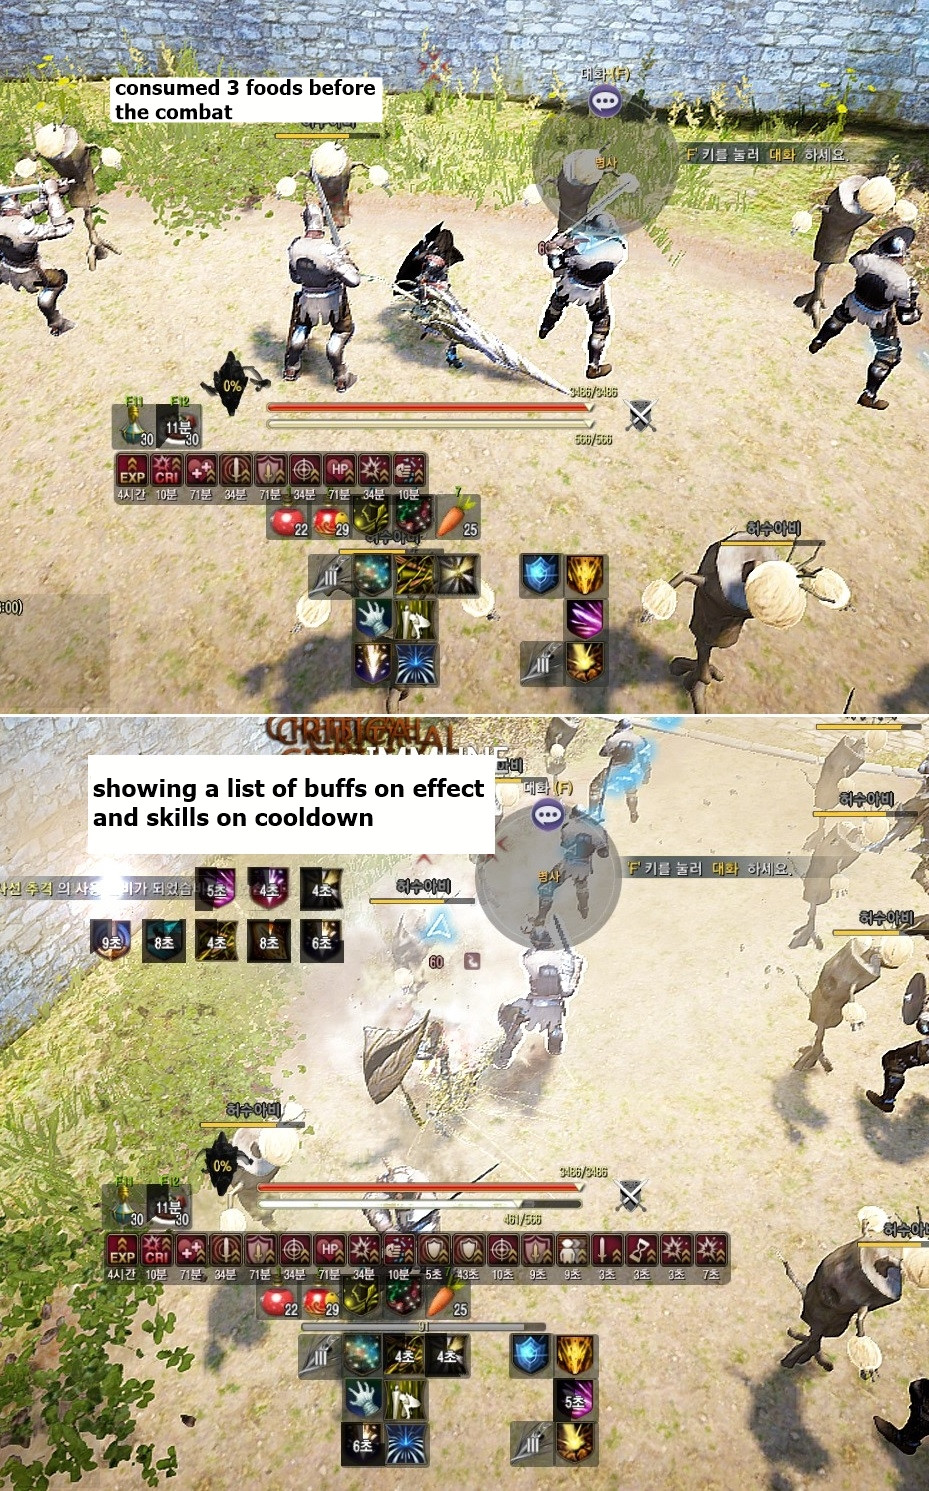
Lancia Infinite Combo in raids
A simple and easy, yet closely calculated combination
It is designed to maintain the basic buffs and overlap specialized buffs.
Skills need to be used at each cooldown in order to receive the front guard and super armor at all times.
The combination is as follows:
Receive the buffs → Sanctum Ferit and Flow: Lucem Fluxum → Sanctum Ferit and Blitz Stab → Maintain +40 defenses when needed

Check out the cooldown of each skill referred to in the table below. The reason why Flow: Lucem Fluxum is placed before Blitz Stab is due to the duration of the 100% critical hit rate of Celestial Spear. Both Hastiludium and Blitz Stab have the 100% critical hit rate, so they are used after the end of the critical hit rate buff of Celestial Spear. It is important to cast Flow: Lucem Fluxum with 100% critical hit rate.
The combination of Sacrum Ferit and Hastiludium provides front guard without delay and also 30% knockdown resistance. Even if you cast Sacrum Ferit Ⅰ and Ⅱ simultaneously, the damage is not so great due to a low critical hit rate, therefore it is better to have Hastiludium and increase the survival rate.
Where the game is too spiky or your hands are too tired, do not use the backward Death Line Chase and forward Righteous Charge. The game will become more laggy when the screen moves by the cast of skills. It is best to not switch the view by moving the mouse and standing still in order to avoid lag.
When you are against a boss and the Black Spirit meter reaches 100%, do not use Black Spirit’s Rage on the boss. Consume it all instead and continue the combination, and do not use Castigatio as well. Both Black Spirit’s Rage and Castigatio do not activate the down attacks.
Note that the additional 20% critical hit rate of Sacrum Ferit renews the Celestial Spear’s specialization effect of additional 20% critical hit rate. You can maintain the infinite 20% critical hit rate buff with Celestial Spear only, therefore you do not need to worry about using Sacrum Ferit. Consider using Sacrum Ferit only if you do not have the specialization effect of critical hit rate on Celestial Spear.

Lancia Infinite Combo in grinding
The combination goes as follows:
Receive the buffs and then Castigatio → Sanctum Ferit and Flow: Lucem Fluxum → Sanctum Ferit and Blitz Stab → 100% Black Spirit Combo when the meter is full → Maintain +40 defense when needed
Use the forward Death Line Chase (↑ + Shift) → Promptness (L click) → Promptness (Space) to the nearest pack of monsters. If you are to move after killing all monsters with Flow: Lucem Fluxum, you can use Sacrum Ferit Ⅰ → Sacrum Ferit Ⅱ → Hastiludium, or Noble Spirit (E) and sprint if the location is far.
Even if the combo is interrupted in the middle, you need to continue from where you stopped, instead of restarting from the beginning. All you need to remember is whether the next skill is either a buff, Flow: Lucem Fluxum, or Blitz Stab.
The combo gets interrupted quite often during the grind, and you should not be bothered too much about this and maintain the combo order. It does not need to be precise. For example, when it is time to use Righteous Charge but move at the same time, you use the skill as a means of movement and continue the combo from Celestial Spear. After killing the previous pack of monsters with Flow: Lucem Fluxum, you can start the combo from Sacrum Ferit Ⅰ and Ⅱ → Hastiludium → Blitz Stab to the next pack.
Castigatio Ⅰ, Ⅱ, and Ⅲ are used in that Step 3 combo. All three skills can be done without delay and the effect of down attack already kills weak monsters at this point. Nearby monsters would approach after that, and you can use the Step 2 and 3 combos while moving to the other destination. This difference of having Castigatio as part of the combo result in quite a different playstyle compared to the raids combo.
Position yourself and continue the combo with the backward Death Line Chase (↓ + Shift) → Promptness (Space) when Valkyrie charges into the pack. Your hands will get used to it after one hour of repetitive combo uses.
As mentioned before, it is better to omit the use of forward Righteous Charge (↑ + F) in raids when the game becomes laggy, however this is not the case in grinding as the skill is used as a means of the movement.
When the Black Spirit Meter becomes 100%, use the combo and rest for a bit.
Maintaining +40 Defense
The combo goes as follows:
Awakened Guard (Q) → Heaven’s Echo (Space) → Shield Chase (→, ↓ + Shift) → halt for 1 second (or pre-Awakened Guard (Q))
After one cycle of the combo, the character should be in the Awakening status after Blitz Stab, and Heaven’s Echo (Space) followed by Awakened Guard (Q) provides +20 defense buff for 60 seconds.
The combination of backward Death Line Chase (↓ + Shift) and sideways Shield Chase (→ + Shift) switches the character to the pre-Awakening form. If you stay still without doing anything for one second at that moment, the pre-Awakened Guard (Q) is activated with repeated +20 Defense buff for 20 seconds. It may be a bit difficult to recognize this buff during the battle. During the raids, however, you can check whether you have the effect or not by pressing the pre-Awakened Guard (Q) by yourself.
The recommended use of this combination is during advanced grinding, or raids where you need to survive instead of dealing more damage, as the time it takes to activate the defense buff creates damage loss.
In comparison, the Valkyrie is a class much easier to maintain buffs with than most other classes such as the Sorceress who needs to repeatedly consume three shards to maintain her infinite +20 AP buff.

Sort by:
Comments :2
-
0
level 1 Nutoboni

 Aug 30, 2017
Thank you for the translation
-
0

level 1 IKrum

 Aug 30, 2017
Thank you for all your work.