Among all of the content BDO offers, the PvE system holds the most significant value in the game. It satisfies the basic element of an RPG (levelling up your character), and is a much more efficient method of earning silver compared to other content. The high income obtained from PvE is very helpful in helping characters gear up and become stronger.
However, not all grinding areas have the same efficiency. Each area has different features - some provide miscellaneous items that can be sold at the market, and monsters in other areas may drop some items that are quite valuable, but not viable for bulk sales due to the low chance of dropping. There are also some popular areas that aren’t very good for leveling up but do have rare item drops.
There are not a whole lot of grinding areas you can choose from until you reach level 56, around when you do the Black Spirit questline, but it is wise to select the area that best suits your playstyle after level 56.
Two birds with one stone - from general items to high class accessories
Yellow accessories generally become part of a supreme equipment setting due to their excellent stats. They are therefore very popular and traded at high prices. You will be able to earn a handsome amount of silver when you obtain this type of item, and there are a couple of grinding areas where you can profit from various aspects such as levelling up, making income from selling miscellaneous items, and obtaining high class accessories.
The most known areas are the Crescent Shrine and Basilisk’s Lair. Many players visit these areas for steady income and an opportunity to obtain some items that can provide a big fortune. In addition to that, the levelling is fairly efficient, thus those areas are recommended for players who would like to earn some silver and level up simultaneously.
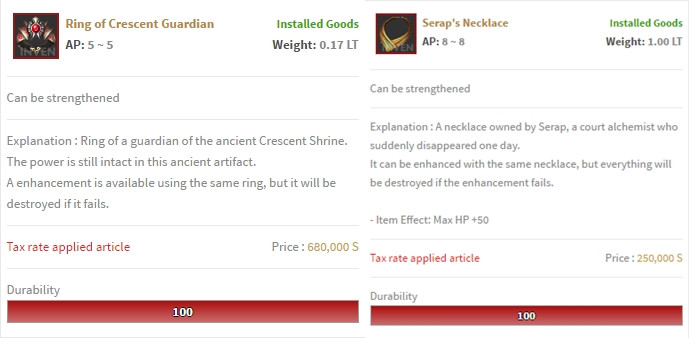
Visit the Crescent Shrine for a chance to get a Ring of Crescent Guardian, one of the most popular accessories
You may make some profit by selling general items from the Crescent Shrine at the market, but the place also drops the Ring of Crescent Guardian, one of the most popular high class accessories. The accessory possesses considerably high AP and is traded at approximately 40 million silvers. It is usually equipped as part of the final set of equipment.
Even without a Ring of Crescent Guardian, you can still make profit from general items like the Token of Crescent or Scroll Written in Ancient Language that are constantly dropped in the area. Also, you can obtain Serap’s Necklace, which has a chance to be dropped from the Crescent Chief Gatekeeper in Crescent Shrine. Note that the monster is quite difficult to deal with on your own, so it is better to party up with other players.
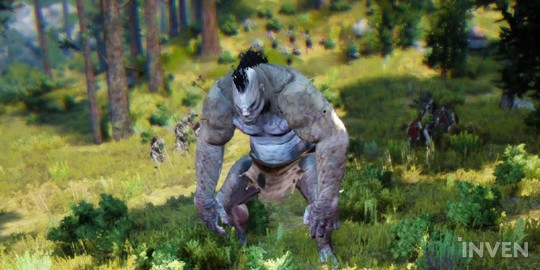
You need to know the skills used by monsters in advance if you are to grind in this area. Some of them use skills that can knock players down, and it is possible that you will then be surrounded and killed by a group of monsters.
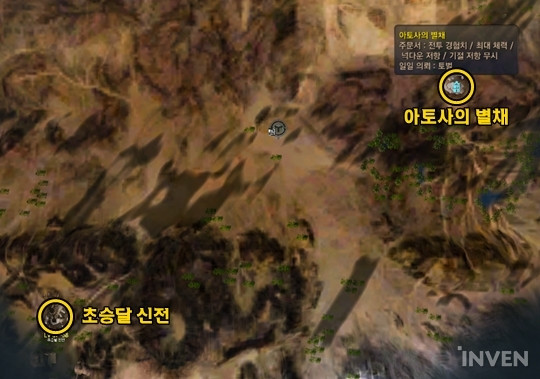
If you would like to increase your chances of survival, it is recommended to have 100% knockdown/bound resistance before visiting the area. Elixir of Resistance may also reduce the chance of being crowd-controlled, and it is better to consume a 10 minute party elixir for easier grinding. You can also visit Atosa’s Villa to receive the knockdown resistance buff.
The Crescent Shrine is considered part of the desert, as it directly faces Valencian Desert, therefore Purified Water and Star Anise Tea are a must-have.
Recommended specifications and main item drops in the Crescent Shrine

Gather Basilisk’s Pieces and obtain an expensive belt
The Basilisk’s Lair is the area where players can gather Basilisk’s Pieces to make Basilisk’s Belt, or even a complete version of it. The accessory is quite popular and is traded at 50 million silvers. It is also considered a part of the final set of equipment, just like Ring of Crescent Guardian, thus transactions of this item are pretty active on the market.
Aside from high class accessories, players can obtain other items such as Basilisk Scales or Rocaba armor and make some profit from those. Note that it is recommended to hunt demihuman Basilisks rather than a human type if you are aiming to gain profits in this way. Players tend to prepare Elixir of Demihuman Hunt in advance for this purpose.

Monsters in this area have slow attack speed, thus it is not as difficult to manage health. If you hunt a pack of monsters for efficiency, it is normal to attack from the back by doing sidesteps rather than facing them directly. However, you need to be cautious and make sure you don’t get surrounded or knocked down when your DP is low, as you could then die quite easily.
Unlike Crescent Shrine, Basilisk’s Lair is close to the city of Altinova and is not in the desert, meaning that neither Star Anise Tea nor Purified Water are needed. You can receive a AP and knockdown resistance nullifying buff at Kunid’s Villa, located north of Basilisk’s Lair.

Recommended specification and main item drops in Basilisk’s Lair

The area specialized in accessories only - for players who want to make it big
There are also some areas that specifically provide expensive accessories rather than EXP or silver. Monsters that appear in these areas are different from the general monsters in other grinding areas, and some of them even appear in the areas where there are no general monsters. The main goal is to hunt these monsters in order to obtain expensive accessories.
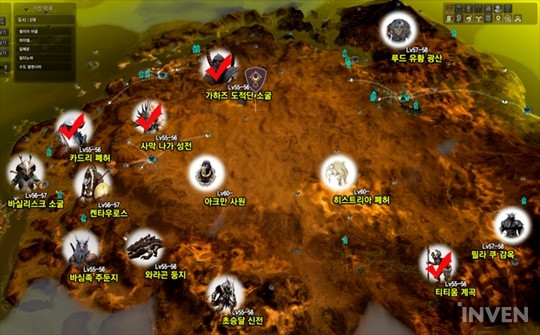
The areas include the Mansha Forest, Cadry Ruins, Titium Valley, Desert Naga Temple, and Gahaz Bandit’s Lair. There are ogres in the Mansha Forest, an area for rather low-levelled players, and they drop the Ogre Ring, the highest class necklace, with low probability. Although they are relatively stronger than other monsters in the Mansha Forest, they are not as difficult if you are properly geared.
There is a monster called Chief Gatekeeper in the other areas listed above and it drops a yellow necklace called Serap’s Necklace. The difficulty of this monster is extremely high; it is almost impossible to solo-kill unless you have the right specs and knowledge. Players therefore usually party up to specifically kill Chief Gatekeeper, and players in this type of party are usually above the level cap of grinding areas, thus you would not want to expect any EXP.
Hunt down Chief Gatekeeper as a party and obtain Serap’s Necklace
The areas like Cadry Ruins, Titium Valley, Desert Naga Temple, and Gahaz Bandit’s Lair offer Serap’s Necklace. It is one of the high-class accessories traded at around 20 million silvers. Although the specs are not considered to be at a ‘final set’ level, the number of transactions of this item is quite high on the market, making it quite a sought-after piece of equipment.
If you would like to obtain one, be aware that the accessory is not dropped from every monster in the areas. There are elite monsters in each area and you need to hunt them in order to obtain the item with certain probability.

In case of Cadry Ruins, you need to hunt the Cadry Chief Gatekeeper and Cadry Commander. Their basic AP and health are quite high, and they attempt an AoE attack when their health is below a certain point. The Desert Fogan Chief Gatekeeper is the one that drops Serap’s Necklace in Titium Valley. The monster rarely appears in the area, and attacks players with chain skills, so you need to be more careful if you are a melee character.
You need to face the Desert Naga Chief Gatekeeper in Desert Naga Temple. Not only does it possess high basic AP and health, it also does ranged attacks depending on the distance. The Commander appears in the Gahaz Bandit’s Lair, and he performs magic attacks, unlike other monsters. It can be difficult to deal with even if you are properly geared.
There is an efficient route where you can focus on killing Chief Gatekeepers only and exit from the areas. You need to hunt the Chief Gatekeeper and Commander in Cadry Ruins, and move to Desert Naga Temple and kill the Chief Gatekeeper there. Use Kunid’s Villa if you are to hunt the Cadry Chief Gatekeeper.
The areas where you can obtain Serap’s Necklace, party up with properly geared players to hunt the Chief Gatekeeper

Get the Ogre Ring, the best necklace, by hunting ogres in the Mansha Forest
Although Mansha Forest is not the area for players at level 56, it is often visited for ogre hunting. You can obtain the necklace called Ogre Ring by hunting them.
The accessory is considered high class, and is one of the items traded at a tremendously high price. It increases AP by 10 and its popularity is almost at a viral level.
With very low probability, you can obtain the complete version of the Ogre Ring from ogres. Even if you do not eventually get the complete version, you can get a Soiled Ogre Ring with slightly higher probability and there is a chance that you can retrieve an Ogre Ring by right-clicking the item. Otherwise, a Shattered Necklace is retrieved and 100 of these can be traded for an Ogre Ring.

Ogres in Mansha Forest are relatively easy to deal with, but you need to roam around the area to find them, as their numbers are quite scarce. Mutant Ogres sometimes appear and they are more difficult to handle on your own and not worth the petty rewards they give, so it is best to avoid them.
According to one experienced player, the node level does not affect the drop rate of Ogre Rings as much, so you do not need to worry much about the node level.

Recommended specification and main item drops in Mansha Forest

Grinding areas where steady income with miscellaneous and mid-priced items is a key
There are also areas where you cannot aim for a rare drops like other areas, but can instead have a steady income. The efficiency differs depending on how many general items the area provides, and you generally earn more silver when the spec is higher.
The Sausan Garrison and Kuit Islands are famous, and the required spec is not as high for players who need more silver. The efficiency of obtaining EXP is reasonably good as you need to slay numerous monsters. These areas are therefore good for those who would like to level up and earn some silver at the same time.
Sausan Garrison, the always-hot location for producing Grunil Armor
Although you cannot obtain any expensive items at Sausan Garrison, you can still make some income by trading equipment and general items on the marketplace. The Sausan Supplies Package and Armor Fragment can be exchanged for a 10G Gold Ingot by talking to the NPC at Sarma Outpost, and Robe Piece for a 10G Gold Ingot by talking to the NPC at Sausan Garrison.
Not only are there general items, but you can also obtain Grunil Armor at Sausan Garrison. This plays a big role in obtaining profits, as the armor is a pre-final equipment piece and is also used in the enhancement system. The price of this item on the marketplace is therefore reasonably high.


To utilize the Sausan Garrison to the maximum, it is important to make your own route. The easiest one is the main area of Sausan Garrison and the dock at the back of the garrison.
Also, monsters at Sausan Garrison are easy to deal with if your character is well-geared to a certain level. Monsters are also usually grouped in packs, thus it is easy to obtain a massive number of items within a short amount of time, by using an Item Collection Increase Scroll for example. In other words, this indicates that the higher spec your character possesses, the faster you hunt monsters and loot more items.
It is important to manage your inventory as the weight of general items is a bit heavy, and items such as Grunil Armor are also easily obtainable. There is other equipment like Krea weapons as well, but the transactions of these items are not as active on the marketplace, thus it is best to discard them. Having a wagon nearby the grinding area and moving items whenever the inventory is full can be a useful method.
If the wagon is full, use a container to manage the items slightly easier. Visit a storage keeper at the village and use 10 Contribution EXP to rent a container, and place it nearby.
Place the rented container at Kusha, the village closest to Sausan Garrison. You can move the goods out from the wagon and store them in Kusha, and manage them in Tarif. You can also send the goods in Tarif by using the transportation system to your main city and make transactions there.
Note that the transportation fee will be expensive if nodes aren’t connected to each other, thus it is better to transport goods to the city with the node connected.
Recommended specification and main item drops in Sausan Garrison

Plunder of various items and mid-priced accessories from pirates at the Kuit Islands
The Kuit Islands, which are known as the ‘Pirate Islands’, is the grinding area where you can obtain accessories such as Blue Coral Earrings or Red Coral Earrings. The Blue Coral Earring increases AP to the certain point, and is actively traded on the marketplace for its effect, as is the Red Coral Earring for increased accuracy.
The Blue Coral Ring and Red Coral Ring are also dropped and are traded at lower prices than the items above, with the Red Coral Ring being the more popular of the two. Although it is not as expensive as the earring, it is dropped more often, so players would be more likely to earn more profits from this item.


A notable point is that you can obtain many coins that can be sold as trade goods, and players with life skills such as processing or trading would benefit more with these.
Even though the area is not as bad for making money, not many players are willing to visit since the area is only accessible by boat. The content available at the village is limited, and it takes quite a long time to approach to the world boss which appears at certain times. Therefore, it is recommended that you prepare well in advance if you are hoping to visit this area. Additionally, there is very little competition for resources here, which can be quite advantageous.
Although people may think that it would be difficult to rearm yourself due to the village being located quite far, there are NPCs in the area that repair and sell potions. Silver obtained from monsters can also be exchanged with gold ingots via the NPC located nearby, and you can use this feature to reduce the weight brought on by silver.
If you plan to grind for awhile at the Kuit Islands, Prepare a number of ship licenses and store your items using these. You can also use either a storage or a transaction maid to store items.
As long as you are cautious of the attacks by particular monsters like Crazy Jack, the area does not require a high spec character, and therefore it would not be as difficult for beginners and low-levelled players.

Recommended specification and main item drops in Kuit Islands


Sort by:
Comments :0


